![1512632091642-p-500.png]](https://help.consignorconnect.com/hs-fs/hubfs/1512632091642-p-500.png?width=131&height=50&name=1512632091642-p-500.png)
Still on Classic Rose? See the Classic Rose steps.
In each screenshot, the yellow boxes show what to click. Numbers give the order.
Overview
A contract is the account for each consignor or vendor. It holds their name and contact details, their split, their payout history, their myPortal access and the defaults for their items.
Where to find it: Dashboard › menu (☰) › Contracts › CREATE.
Important: each section of the contract has its own SAVE CHANGES button. Save each section before you scroll on to the next one.
Step 1: Open Contracts from the Dashboard
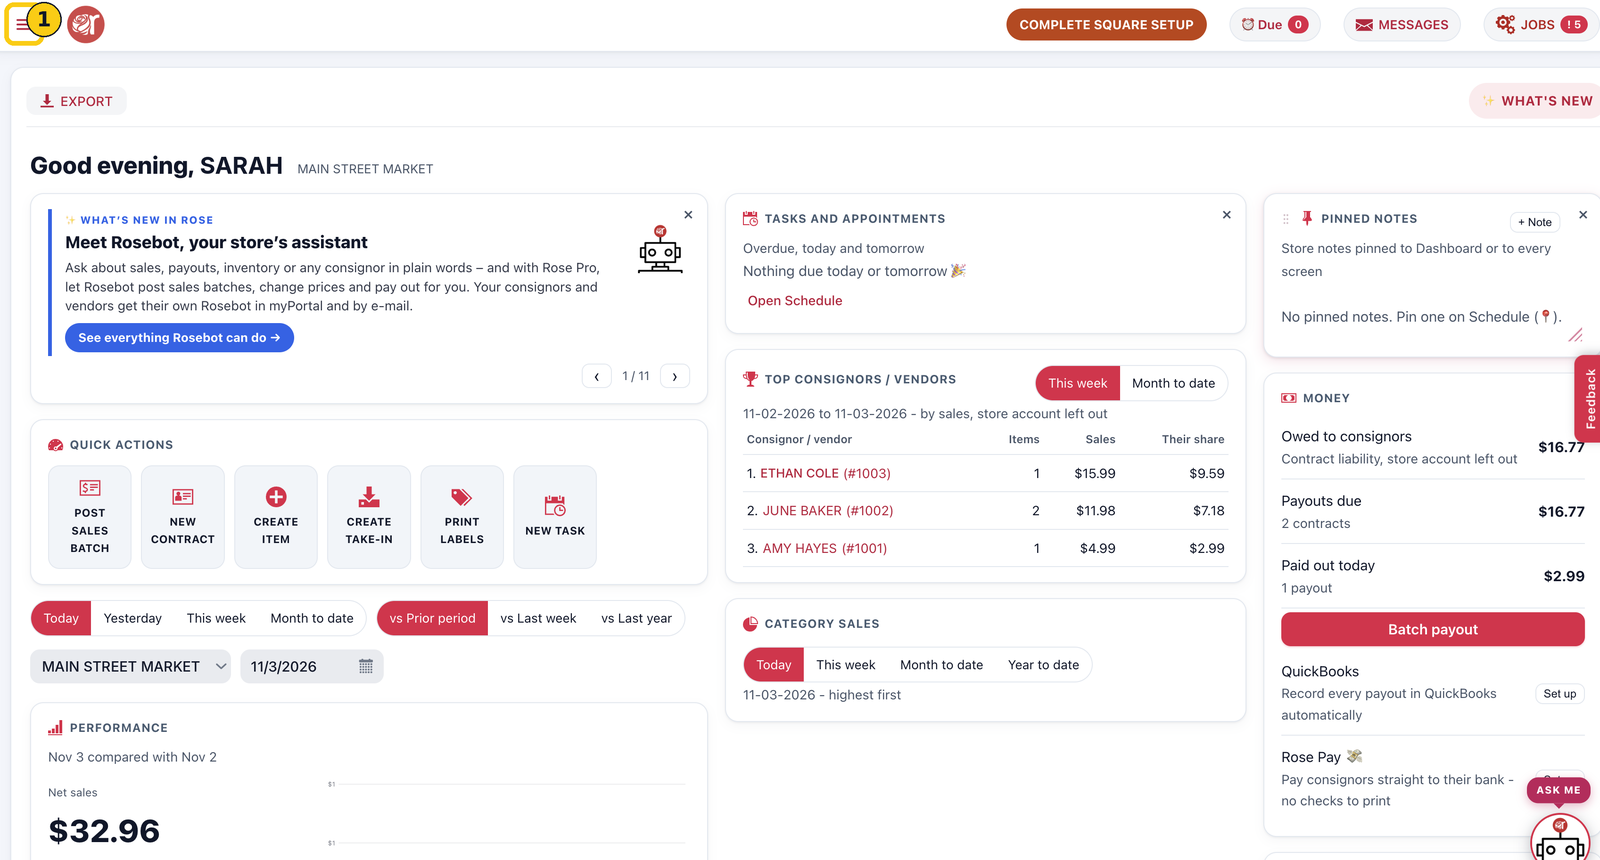
1. On your Dashboard, click the menu icon (☰) in the top-left corner.
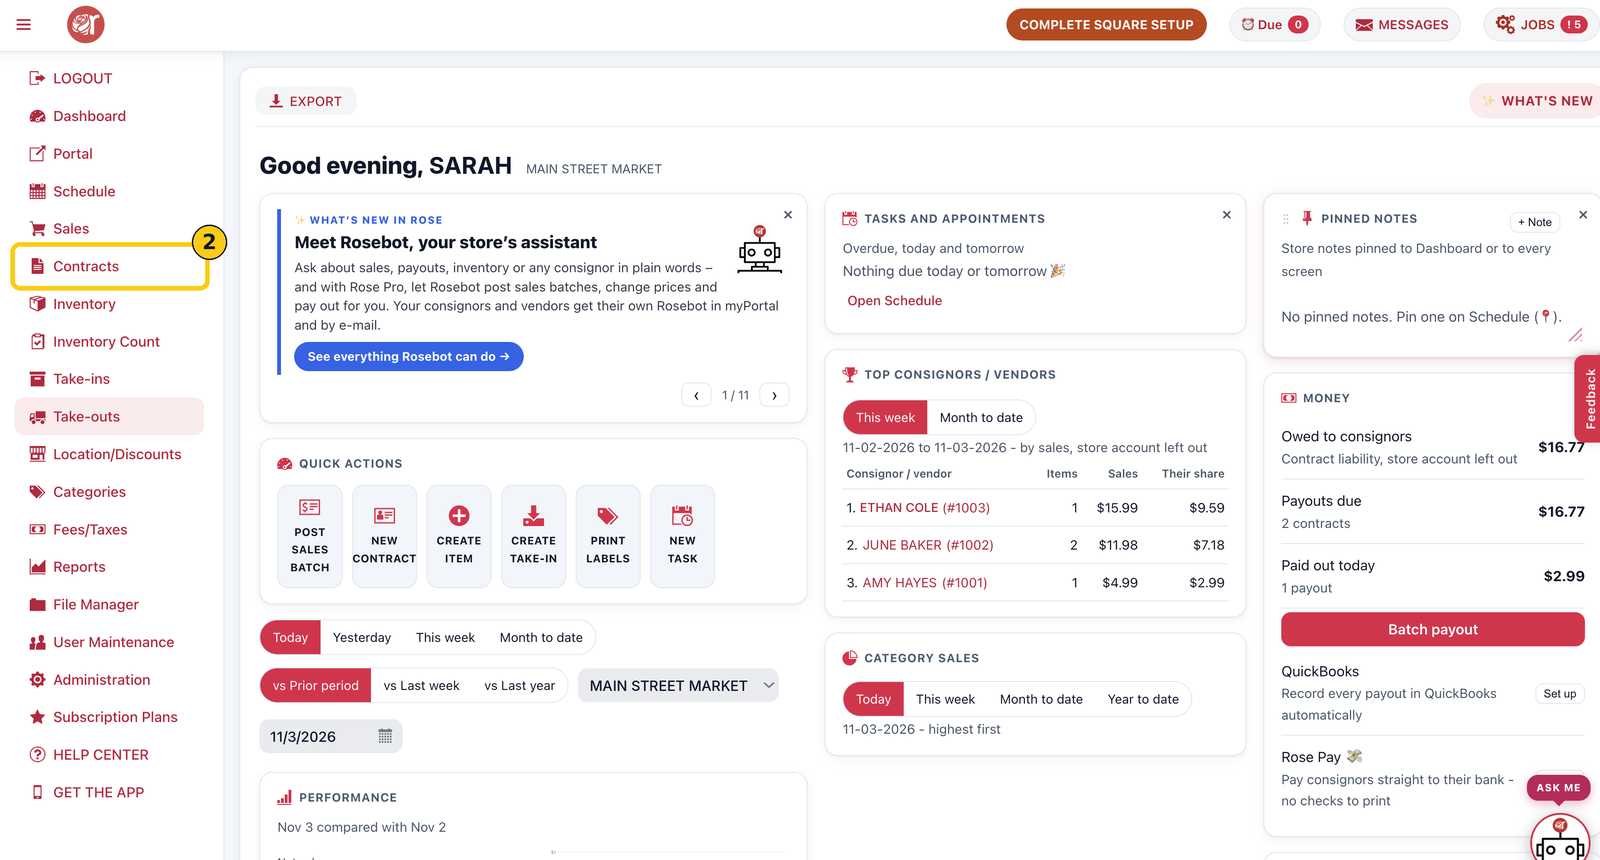
2. Click Contracts.
Step 2: Enter the consignor's name
1. Click CREATE.
2. Enter the LASTNAME and FIRSTNAME, plus MI and BUSINESS if they have them.
3. Click SAVE CHANGES.
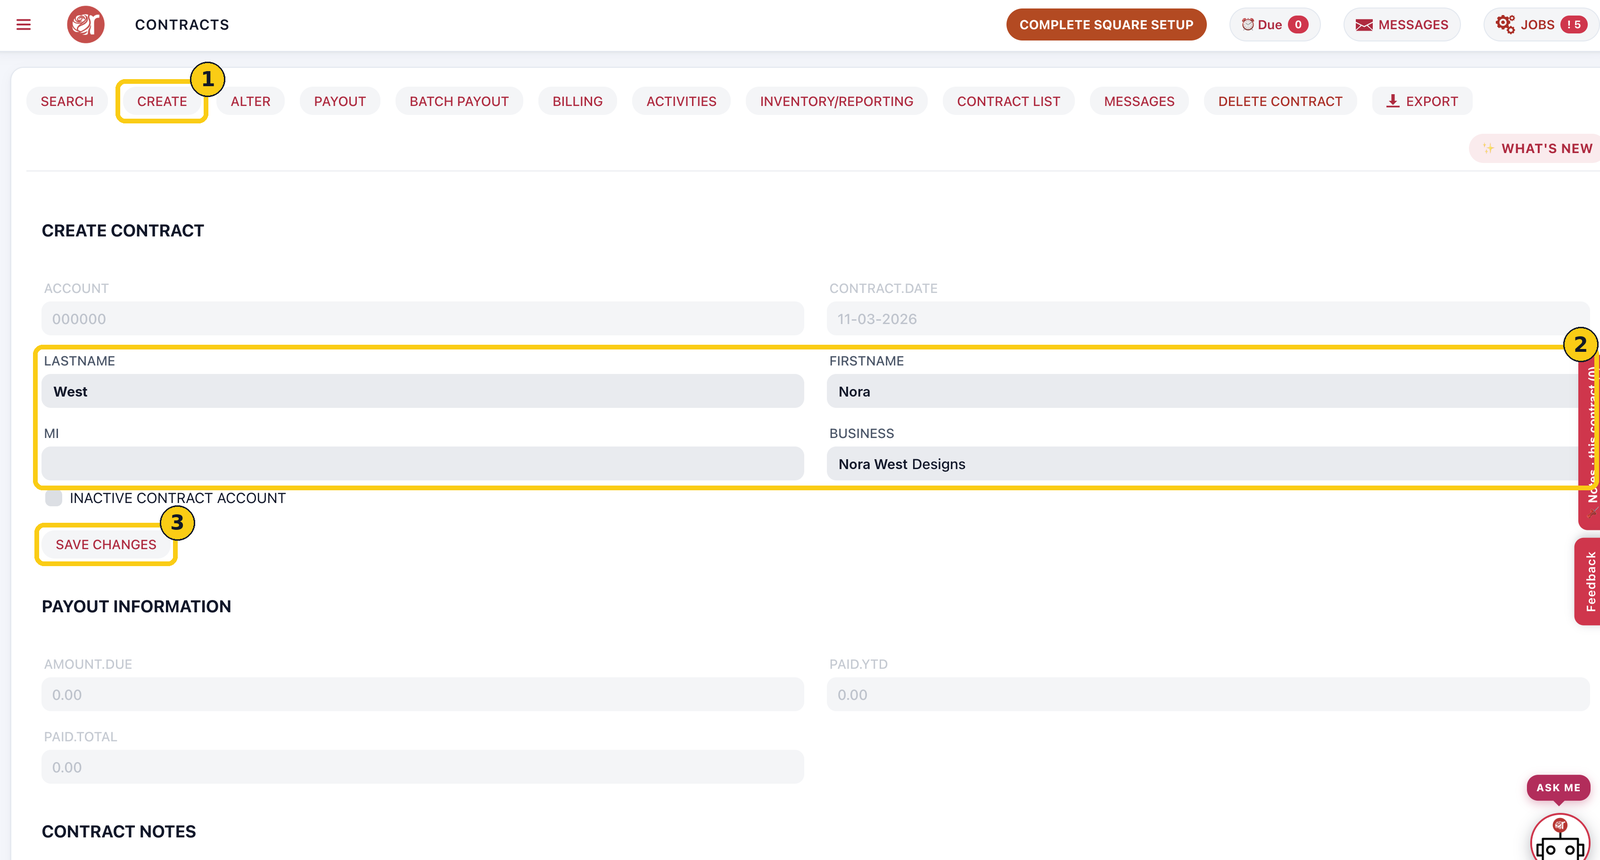
The ACCOUNT number shows 000000 until you save; Rose gives the contract its number when it's saved. CONTRACT.DATE is filled in with today's date.
Step 3: Set the split
PAYOUT INFORMATION (amount due, paid this year, paid in total) fills in by itself as items sell and payouts are made. Use CONTRACT NOTES for anything staff should know about this consignor.
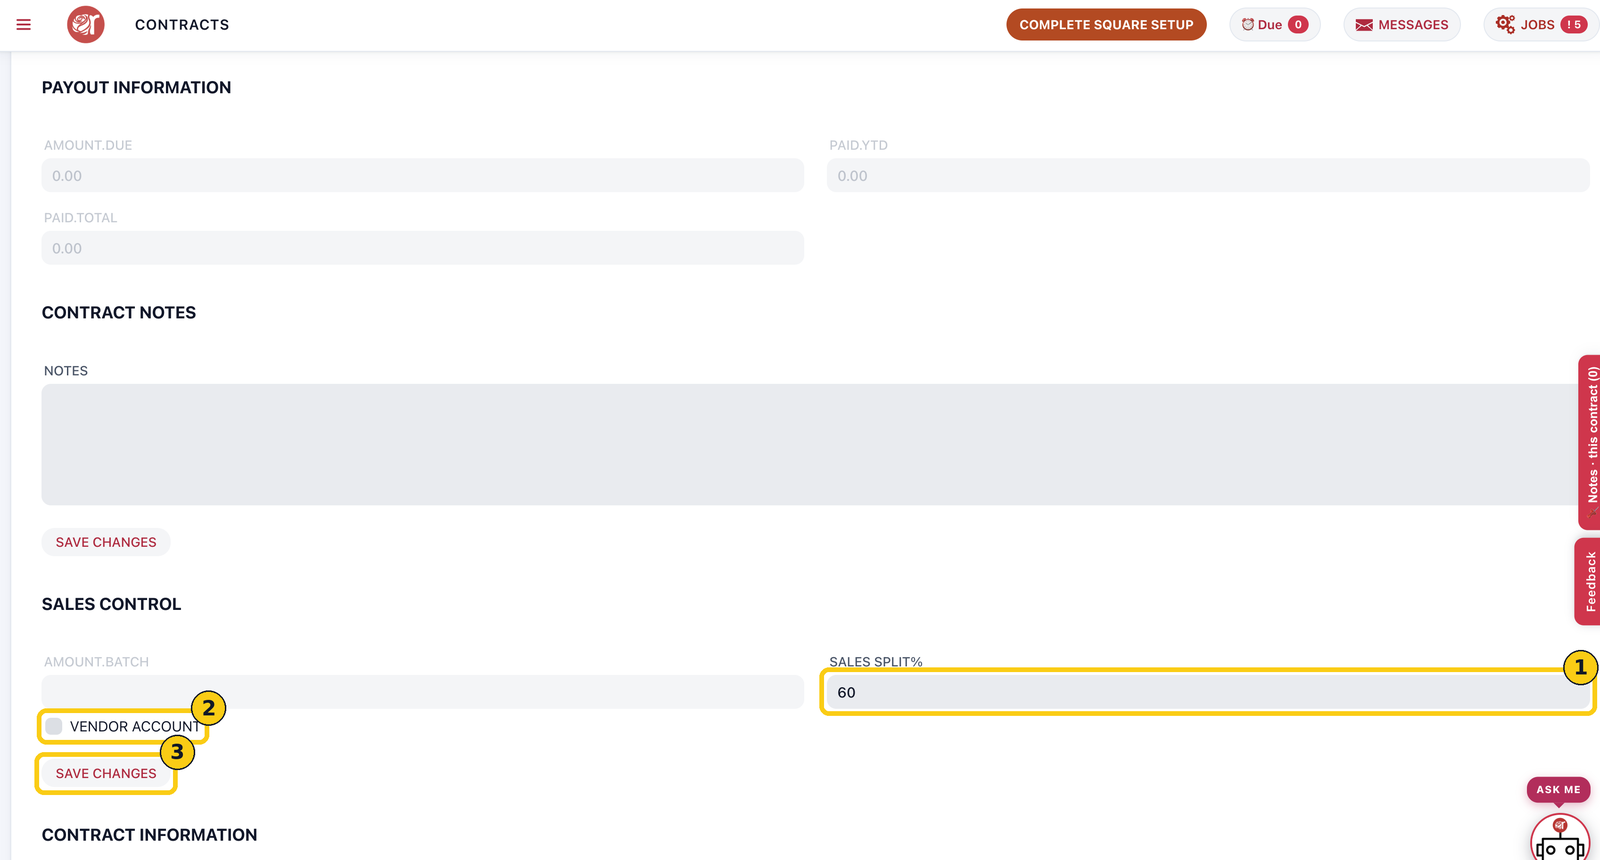
1. In SALES CONTROL, enter the SALES SPLIT%: the consignor's share of each sale. For example, 60 pays them $3.00 of a $5.00 sale.
2. Tick VENDOR ACCOUNT if this account is a vendor rather than a consignor.
3. Click SAVE CHANGES under Sales Control.
Step 4: Add contact details and myPortal access
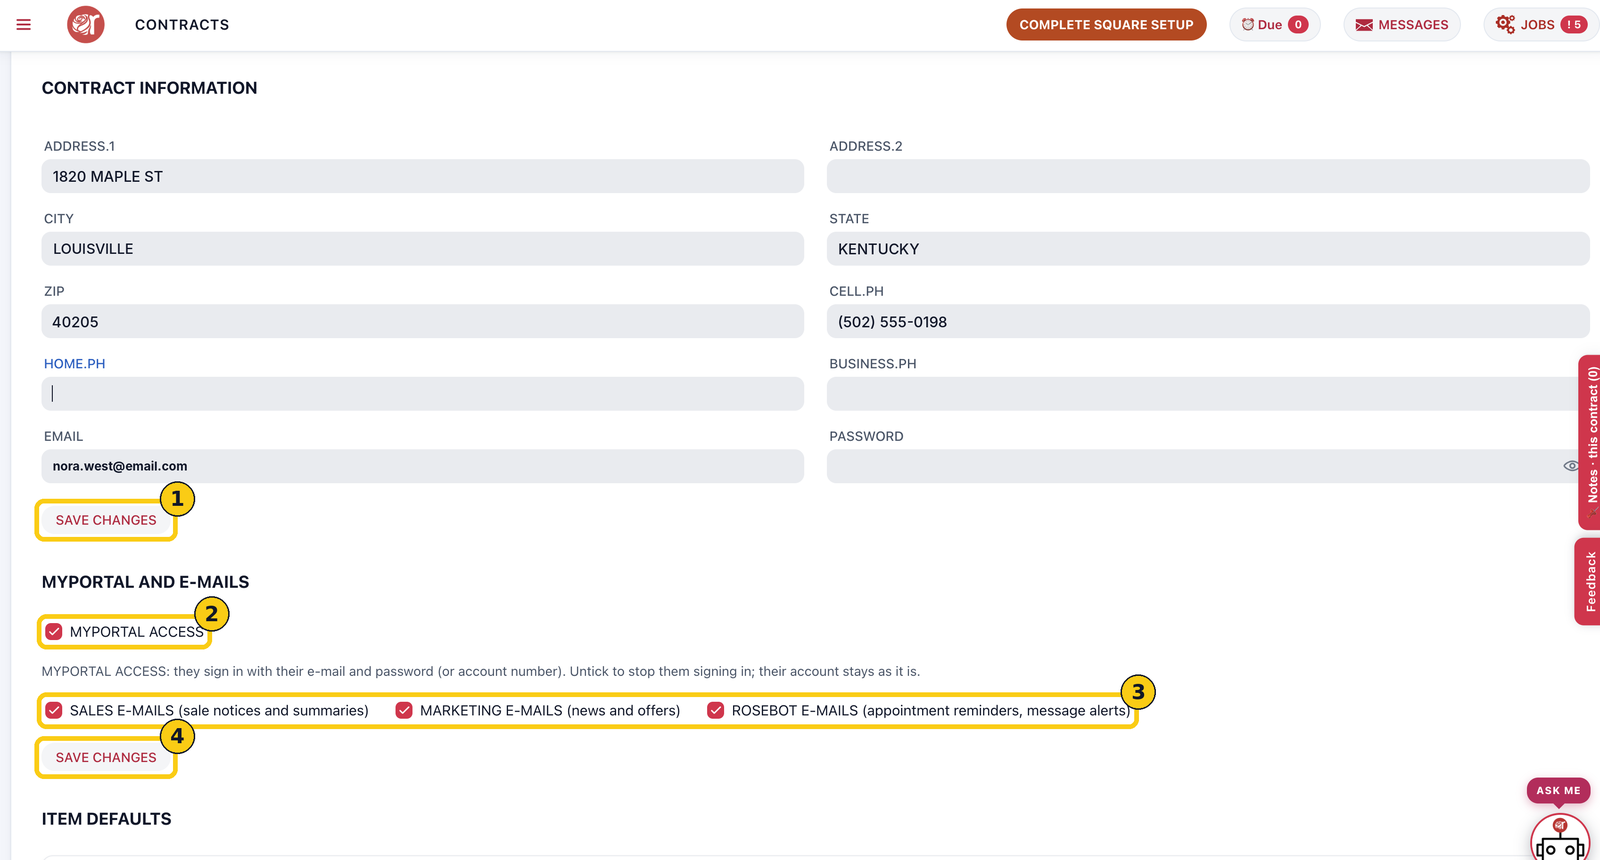
1. In CONTRACT INFORMATION, enter the address, phone numbers and EMAIL. Set a PASSWORD if they'll sign in to myPortal. Click SAVE CHANGES.
2. Under MYPORTAL AND E-MAILS, tick MYPORTAL ACCESS so they can sign in with their e-mail and password (or account number). Untick it later to stop them signing in; their account stays as it is.
3. Choose which e-mails they get: SALES E-MAILS (sale notices and summaries), MARKETING E-MAILS (news and offers) and ROSEBOT E-MAILS (appointment reminders and message alerts).
4. Click SAVE CHANGES.
Step 5: Item defaults (optional)
Item defaults set how this consignor's new items start out. Save the contract first; until then its items use the store's defaults (Administration › Settings › ITEM DEFAULTS).
Every setting starts on STORE DEFAULT, which follows the store's choice and keeps following it if the store changes it later. Anything else you pick wins for this consignor's new items, so only change what's different for them.
Starting values
| Setting | What it does |
|---|---|
| Home location | Where this consignor's items (and take-ins) start |
| Category | Its price, shelf life and fees fill in when it's picked |
| Quantity | Starting quantity (blank = the store's, not counted) |
| Pricing type | How items are priced (the store default is fixed pricing) |
| Low warning, low threshold | Low-stock alerts (blank threshold = the store's, 0) |
Boxes ticked on a new item
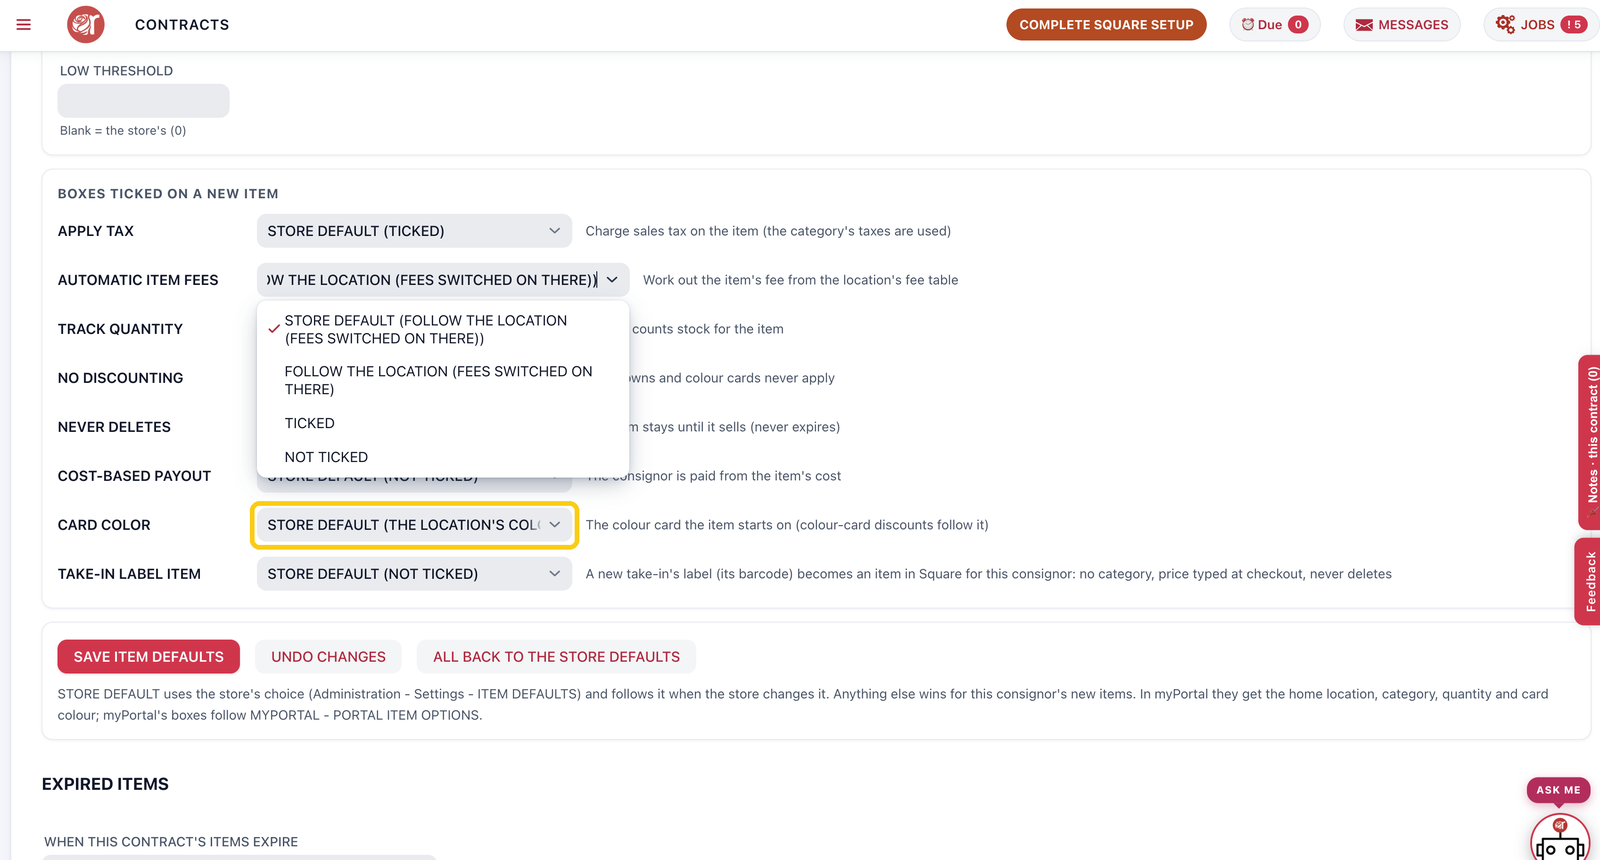
Each of these offers STORE DEFAULT, TICKED or NOT TICKED. AUTOMATIC ITEM FEES also offers FOLLOW THE LOCATION (fees switched on there), and CARD COLOR offers the location's colour or a set colour.
| Setting | When ticked | Store default |
|---|---|---|
| Apply tax | Charge sales tax on the item (the category's taxes are used) | Ticked |
| Automatic item fees | Work out the item's fee from the location's fee table | Follow the location |
| Track quantity | Square counts stock for the item | Ticked |
| No discounting | Markdowns and colour cards never apply | Not ticked |
| Never deletes | The item stays until it sells (never expires) | Not ticked |
| Cost-based payout | The consignor is paid from the item's cost | Not ticked |
| Take-in label item | A new take-in's label (its barcode) becomes a Square item for this consignor: no category, price typed at checkout, never deletes | Not ticked |
1. Open the dropdown for each setting you want to change and pick the new value.
2. Click SAVE ITEM DEFAULTS.
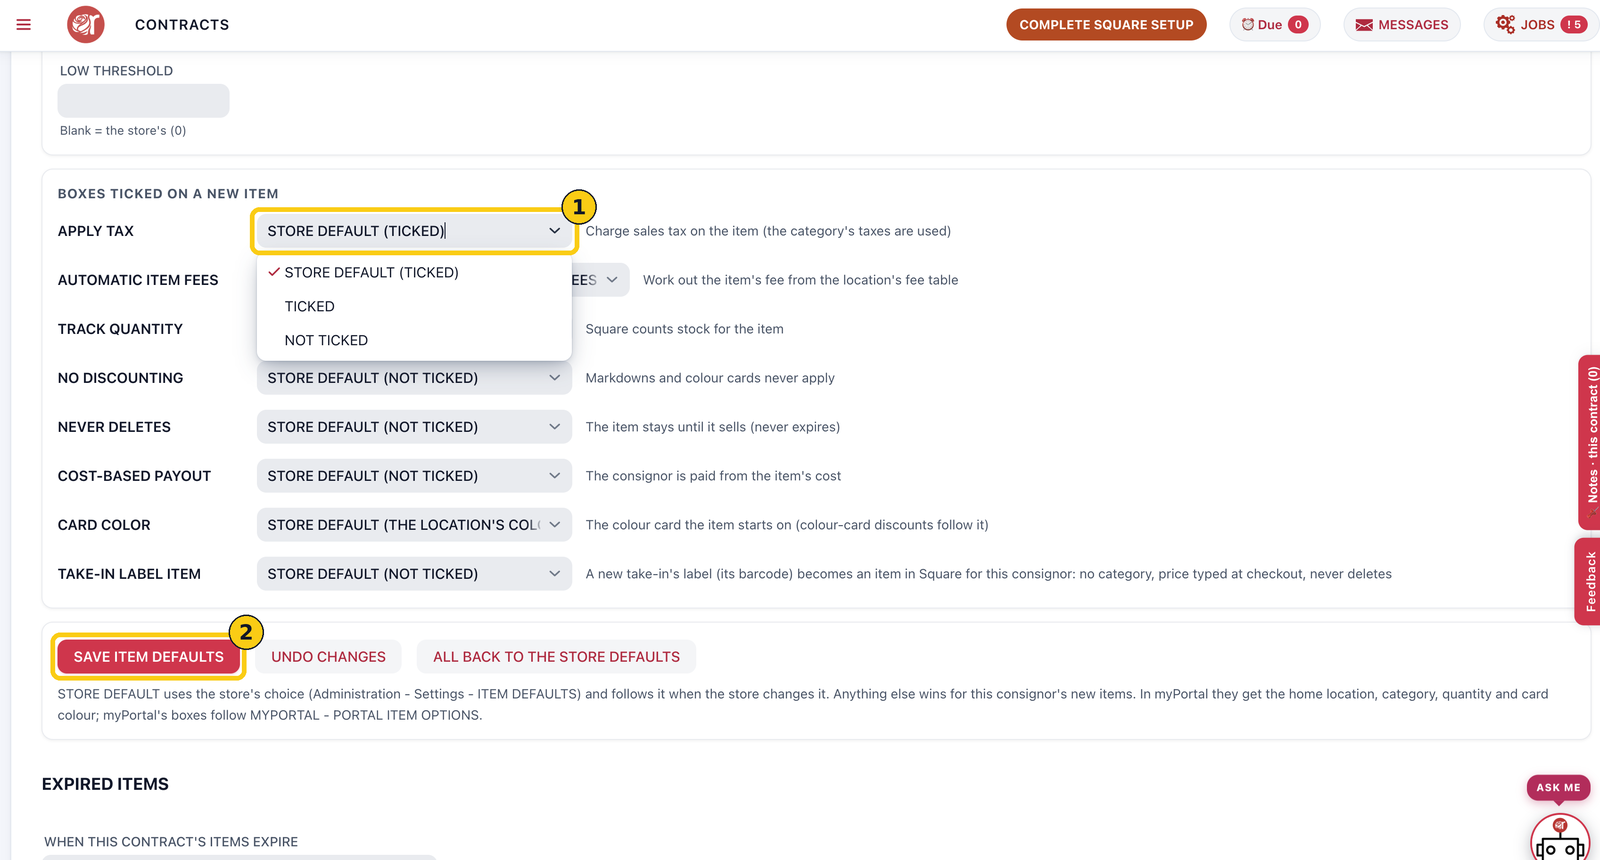
CARD COLOR choices: the location's colour, Light Blue, Blue, Light Green, Green, Yellow, Orange, Peach, Gray, Purple, Pink, Red or White. Colour-card discounts follow the colour the item starts on.
Made a mistake? UNDO CHANGES drops edits you haven't saved, and ALL BACK TO THE STORE DEFAULTS resets every setting to STORE DEFAULT.
myPortal: when this consignor adds items in myPortal, they get the home location, category, quantity and card colour set here. myPortal's tick boxes follow MYPORTAL › PORTAL ITEM OPTIONS instead.
Step 6: Expired items (optional)
1. Under EXPIRED ITEMS, open WHEN THIS CONTRACT'S ITEMS EXPIRE and choose: STORE DEFAULT (the store's setting, which is to leave them on this contract), TRANSFER TO STORE INVENTORY (move them to the contract shown in TRANSFER TO CONTRACT #, the store account), or DON'T TRANSFER (they stay on this contract).
2. Click SAVE EXPIRED ITEMS.
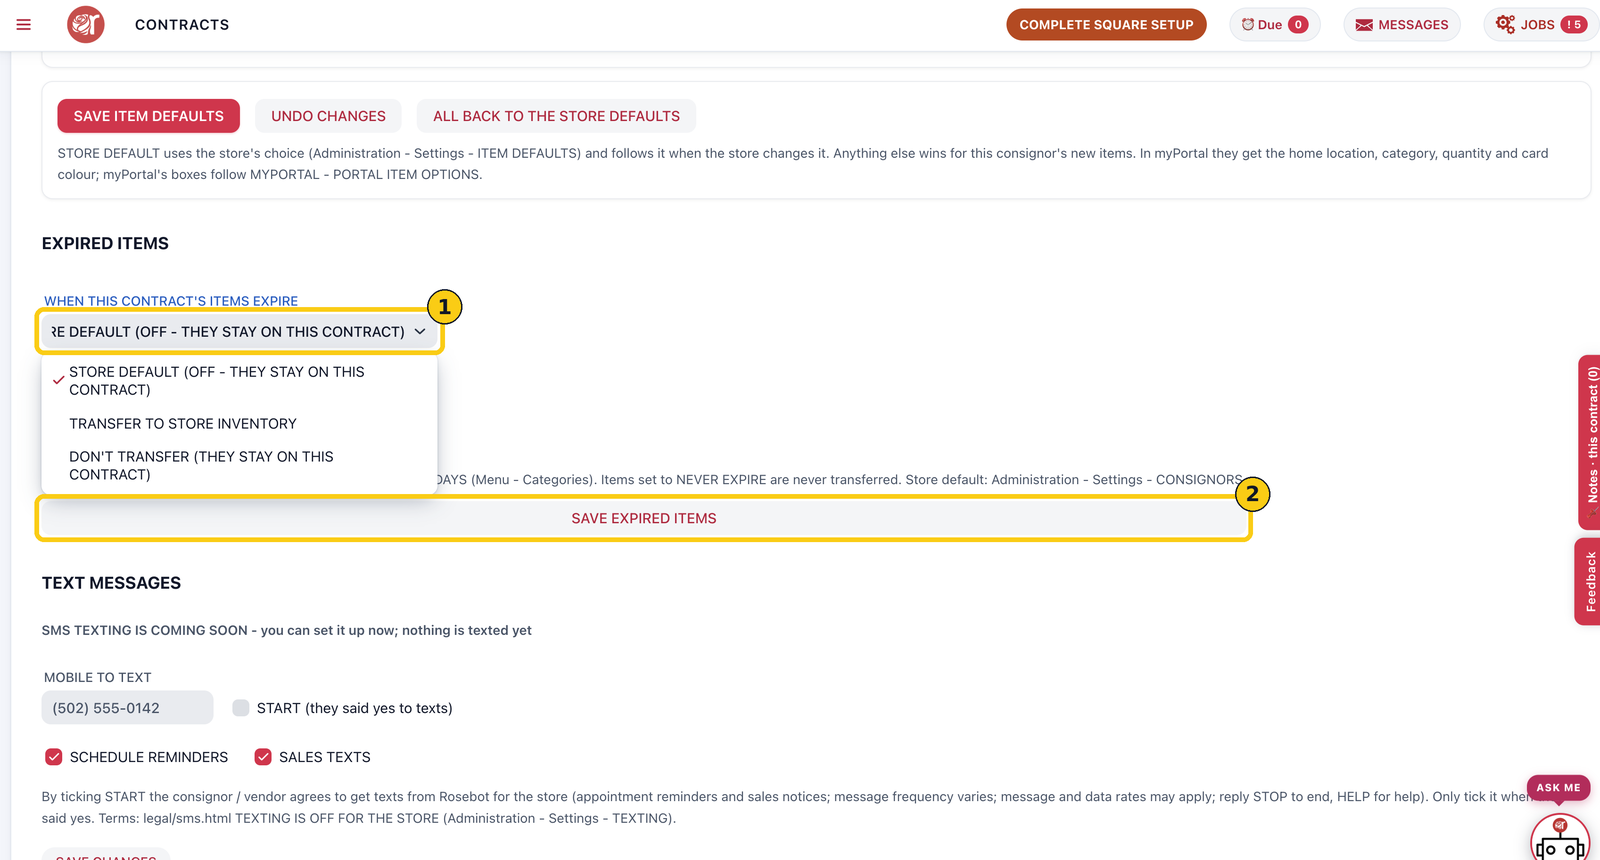
Expiry dates come from each category's SHELFLIFE DAYS (Menu › Categories). Items set to never expire are never transferred. The store-wide setting is in Administration › Settings › CONSIGNORS.
Step 7: Text messages (optional)
Note: SMS texting is coming soon. You can set it up now, but nothing is texted yet.
1. Under TEXT MESSAGES, enter the MOBILE TO TEXT number.
2. Tick START only when the consignor has said yes to texts. Ticking it records their consent to appointment reminders and sales notices from Rosebot (they can reply STOP to end).
3. Choose SCHEDULE REMINDERS and SALES TEXTS, then click SAVE CHANGES.
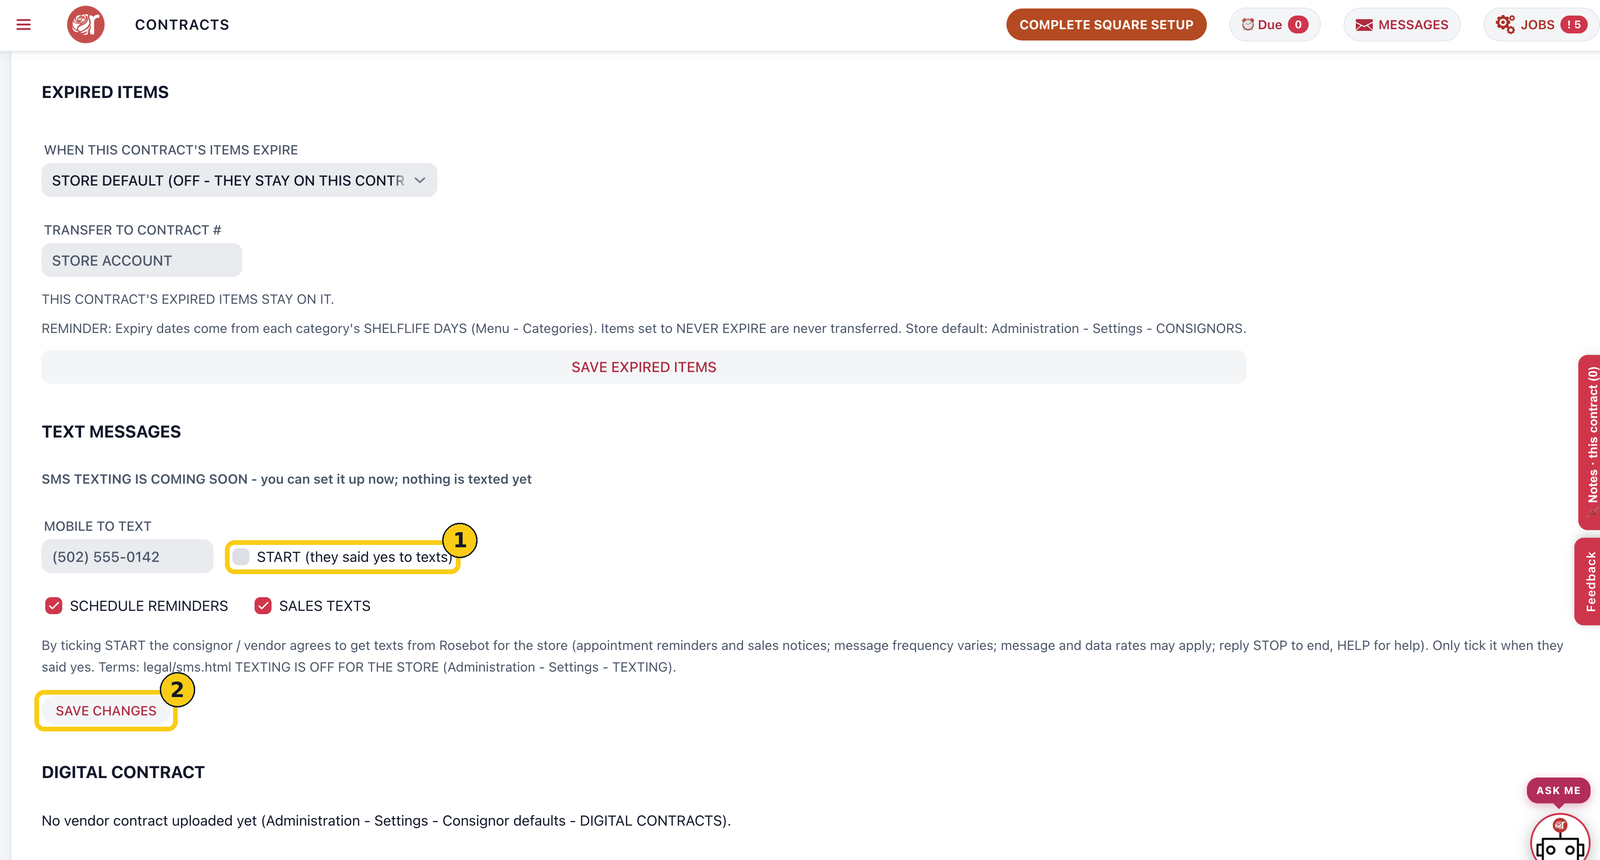
Texting must also be switched on for the store in Administration › Settings › TEXTING. A DIGITAL CONTRACT appears under this section once one is uploaded in Administration › Settings › Consignor defaults › DIGITAL CONTRACTS.
Step 8: Find the new contract
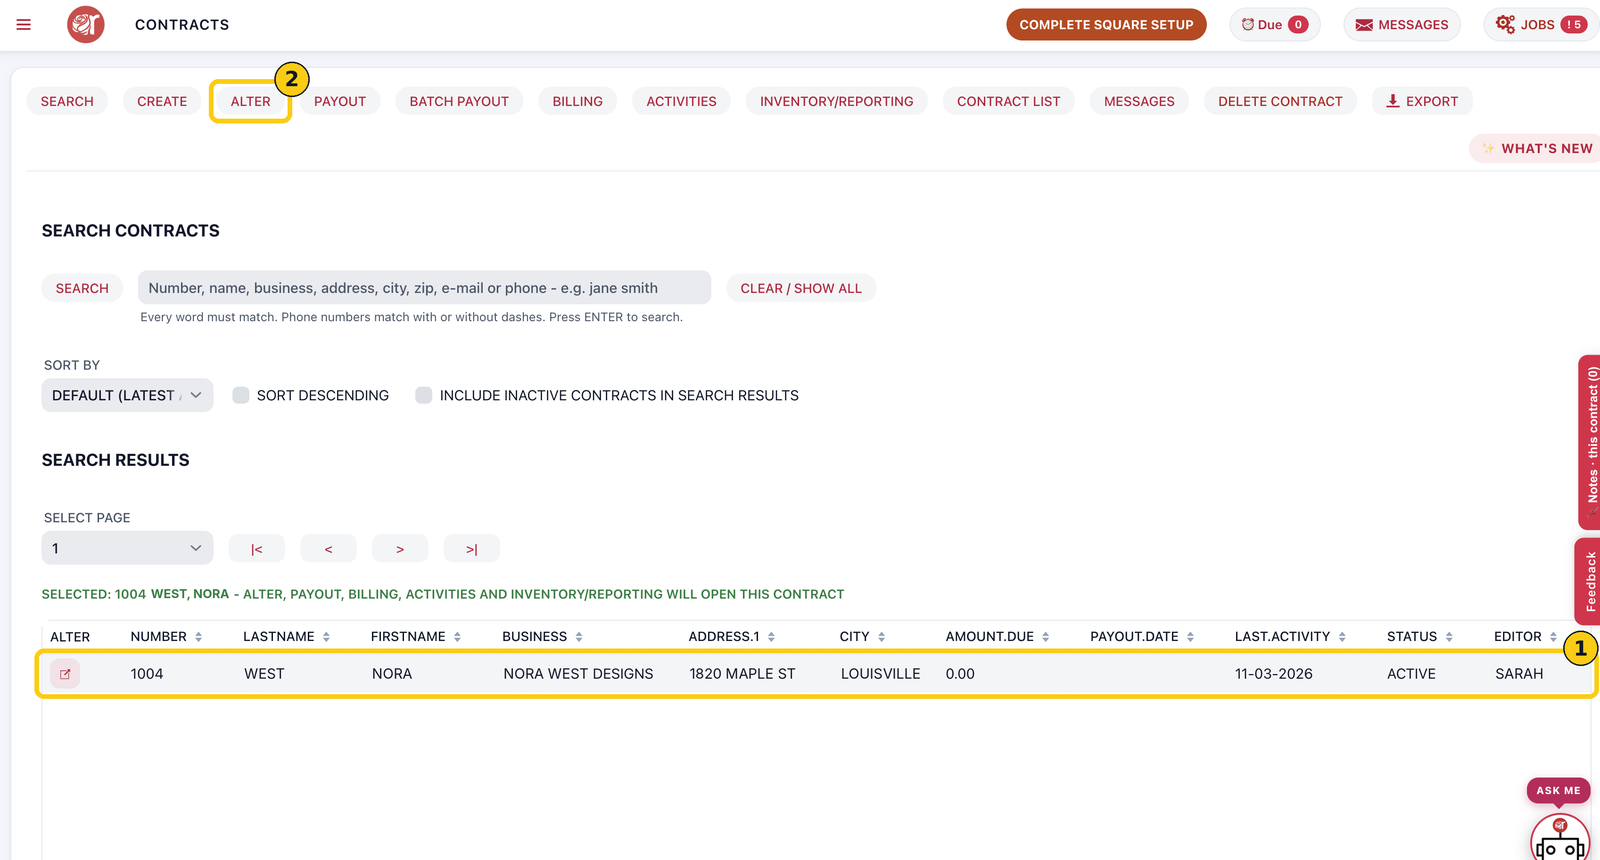
1. Click SEARCH and look up the consignor. The new contract is listed with its account number.
2. Click the row to select it. ALTER, PAYOUT, BILLING, ACTIVITIES and INVENTORY/REPORTING now open this contract.
FAQ
How do I close a contract?
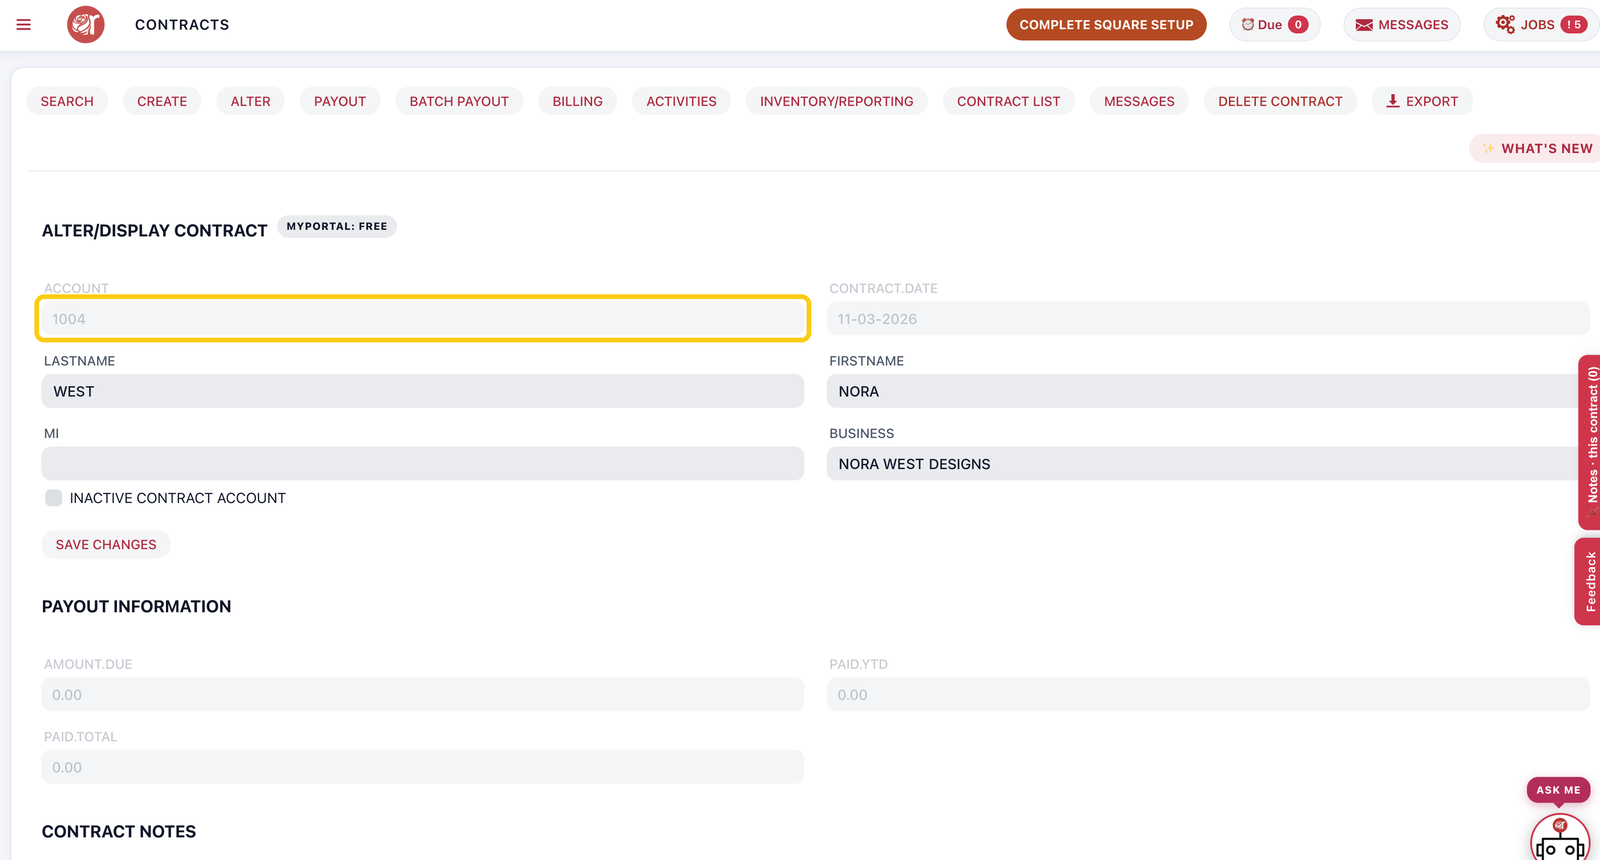
Open it with ALTER, tick INACTIVE CONTRACT ACCOUNT and click SAVE CHANGES. Inactive contracts are left out of search unless you tick INCLUDE INACTIVE CONTRACTS IN SEARCH RESULTS.
Can I change the split later?
Yes. Open the contract with ALTER, change SALES SPLIT% and click SAVE CHANGES under Sales Control.
Do I have to fill in every section?
No. Only the name is needed to save. Everything else can be added later with ALTER.