![1512632091642-p-500.png]](https://help.consignorconnect.com/hs-fs/hubfs/1512632091642-p-500.png?width=131&height=50&name=1512632091642-p-500.png)
Choose what prints on your labels, set your default labels, and - with Rose Pro - place every detail yourself in the LABEL DESIGNER, with its own font size, bold and alignment, once for each label size. Rose and myPortal print every label of that size with your design.
Your label settings (Rose)
- Open Administration → SETTINGS → LABELS.
- Pick your ROSE DEFAULT LABEL - the label a new item starts on in Inventory and Take-ins, and the one printing starts on. MYPORTAL DEFAULT LABEL is the one your consignors' and vendors' new items start on (SAME AS THE ROSE DEFAULT LABEL uses yours). Each is saved as soon as you change it.
- Under PRINT ON LABELS tick the details you want (CORE DETAILS, EXTRA DETAILS, MARKDOWNS) and press SAVE LABEL DETAILS. RESET TO STANDARD puts the usual ticks back.
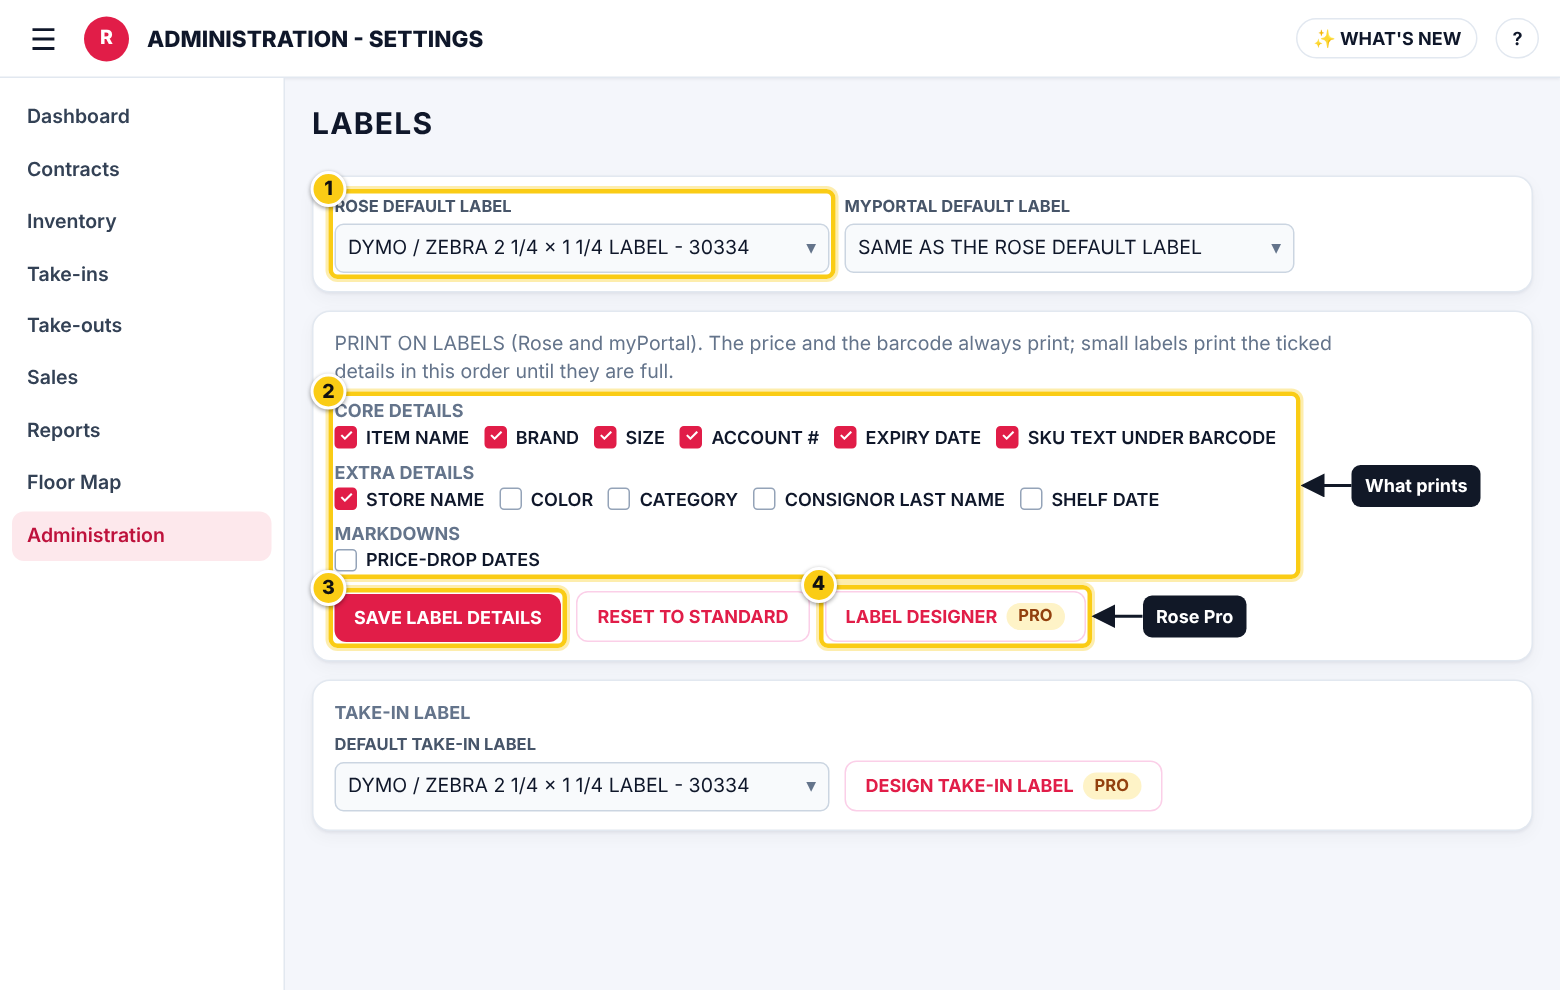
(1) your default label, (2) what prints, (3) SAVE LABEL DETAILS, (4) LABEL DESIGNER (Rose Pro).
- The price and the barcode always print. Small labels print the ticked details in this order until they are full.
- People can still pick another label each time they print.
Open the label designer (Rose Pro) (Rose)
- In the LABELS settings press LABEL DESIGNER. Without Rose Pro it shows what Rose Pro adds instead.
- Pick the label in LABEL SIZE. Next to it you see SAVED DESIGN, or AUTOMATIC LAYOUT - NOT DESIGNED YET for a size you haven't designed (it opens on a starting design that matches the standard label).
- There is one design per label size: the Dymo / Zebra 2 1/4 x 1 1/4, 2 x 1.5 and 2 x 1 labels, the 1 x 1 label (shared by Dymo 30332, Zebra 1 x 1 and the Avery Presta 94103 sheet), the Avery 1 x 2-5/8 sheet, the Dymo jewelry 2-up label and the Zebra jewelry label.
- The label is drawn to scale with a sample item, so you can see how real text fits.
Move, resize and style each piece (Rose)
- Drag a piece to move it.
- Click a piece to select it, then drag the small square in its bottom-right corner to make it wider or taller.
- In the panel on the right set its FONT SIZE, BOLD and ALIGN (LEFT, CENTER, RIGHT). To place it exactly, type LEFT (pt), TOP (pt), WIDTH (pt) and HEIGHT (pt) - 72 pt = 1 inch.
- To leave a piece off this size only, untick PRINT ON THIS LABEL SIZE.
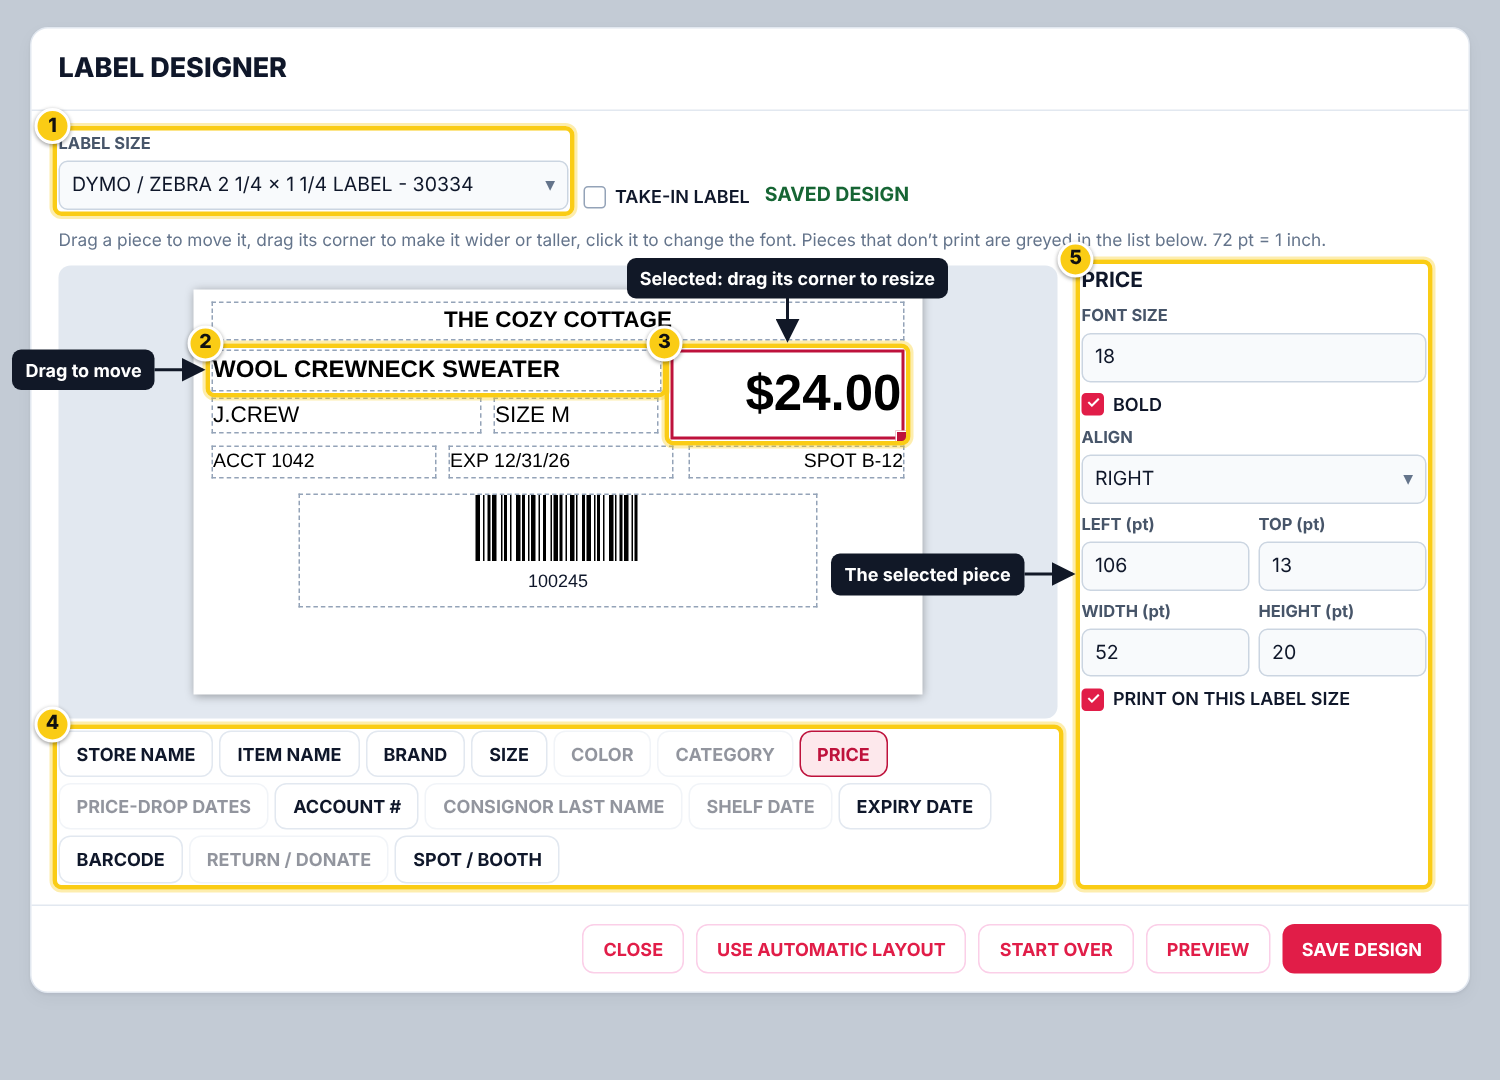
(1) LABEL SIZE, (2) drag a piece, (3) the selected piece and its corner, (4) the pieces by name (grey = not printed), (5) the selected piece's settings.
- The pieces: STORE NAME, ITEM NAME, BRAND, SIZE, COLOR, CATEGORY, PRICE, PRICE-DROP DATES, ACCOUNT #, CONSIGNOR LAST NAME, SHELF DATE, EXPIRY DATE, BARCODE, RETURN / DONATE and SPOT / BOOTH. RETURN / DONATE and SPOT / BOOTH only print when you place them here.
- A greyed piece isn't printed: tick it in PRINT ON LABELS (or PRINT ON THIS LABEL SIZE) to print it.
- For the barcode, FONT SIZE is the size of the SKU under the bars and HEIGHT is the bar height. The price and the barcode always print.
Preview and save (Rose)
- Press PREVIEW to see the real label PDF, exactly as it will print (not saved yet).
- Press SAVE DESIGN. Rose says LABEL DESIGN SAVED and prints that label size with it - in Rose and myPortal, from every print screen, PrintNode / KloudPrint printers and Avery sheets.
- Pick another size in LABEL SIZE to design it too, or press CLOSE.
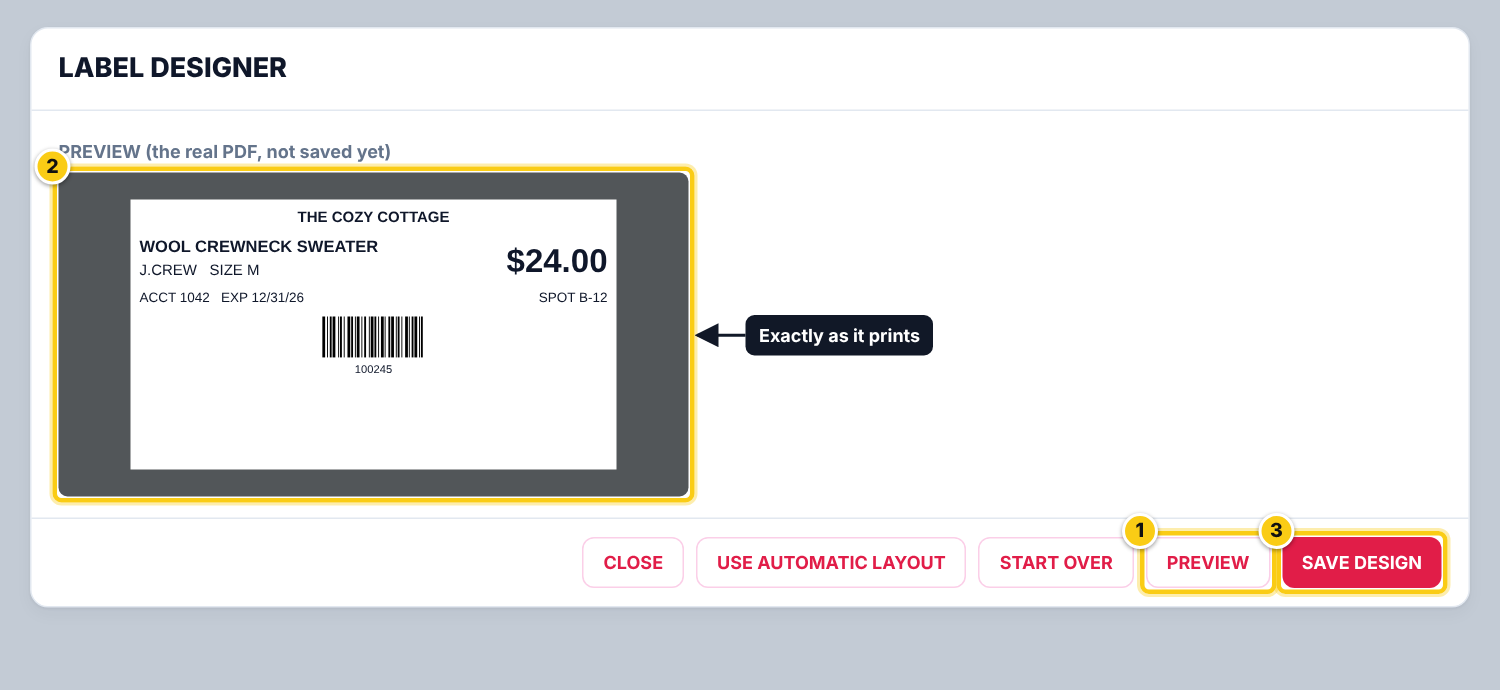
(1) PREVIEW, (2) the real label PDF, (3) SAVE DESIGN.
Tip: Save before you switch sizes - unsaved changes are thrown away (Rose warns you).
Design the take-in label (Rose)
- In the LABELS settings press DESIGN TAKE-IN LABEL (Rose Pro), or tick TAKE-IN LABEL in the designer.
- Place its own pieces - CONTRACT #, CONSIGNOR NAME, TAKE-IN DATE and BARCODE - the same way, then SAVE DESIGN.
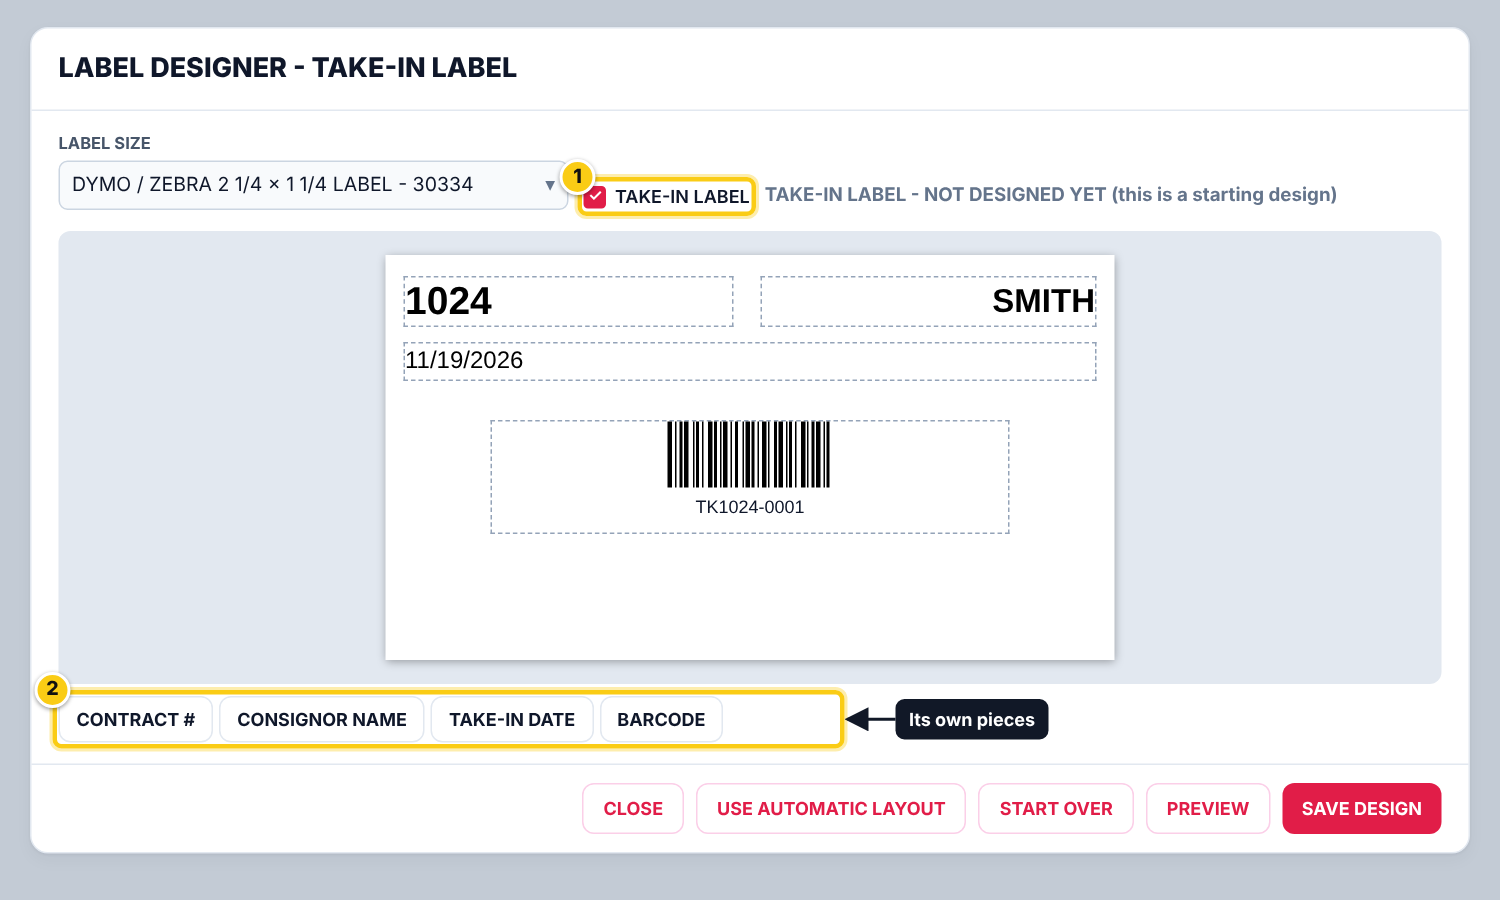
(1) TAKE-IN LABEL, (2) the take-in label's pieces.
- DEFAULT TAKE-IN LABEL (in the LABELS settings) is the label PRINT TAKE-IN LABEL starts on.
Start over or go back to the standard label (Rose)
- START OVER puts the starting design back on screen; nothing changes until you press SAVE DESIGN.
- USE AUTOMATIC LAYOUT deletes the saved design for that size straight away, and that size prints the standard label again. A deleted design can't be brought back.
Who can do this (user rights)
| Right in User Maintenance | What it allows | Who has it at first |
|---|---|---|
| Administration and Subscription Plans | Opens Administration → SETTINGS, the LABELS settings and the LABEL DESIGNER. | Users with Administration ticked in User Maintenance (normally administrators) |
| Rose Pro | LABEL DESIGNER and DESIGN TAKE-IN LABEL. Saved designs keep printing if Rose Pro ends. | Rose Pro and Rose Enterprise stores |
Questions
Do I have to design every label size?
No. Sizes you don't design keep printing the standard layout.
Something doesn't fit on the label.
Text is cut at the width you gave the piece, and the price shrinks to fit its box. Make the piece wider or the font smaller, then PREVIEW again.
Why does my 1 x 1 design also change my Avery Presta sheets?
The Dymo 1 x 1, Zebra 1 x 1 and Avery Presta 94103 labels are the same size, so they share one design.
Do labels printed in myPortal use my design?
Yes. Labels your vendors print in myPortal use your PRINT ON LABELS ticks and your saved design for that size. Consignors and vendors can't see or change the designer.
My label prints too small, sideways or cut off.
That's a printer setting, not the design: see My label printed wrong: how to fix it.
Still stuck? Ask Rosebot (the bubble at the bottom right of Rose and myPortal) or contact Consignor Connect support.