![1512632091642-p-500.png]](https://help.consignorconnect.com/hs-fs/hubfs/1512632091642-p-500.png?width=131&height=50&name=1512632091642-p-500.png)
Still on Classic Rose? See the Classic Rose steps.
In each screenshot, the yellow boxes show what to click. Numbers give the order.
Overview
A take-in is how items come into Rose: you start a take-in for a consignor or vendor, add each item, print its labels, then post the items to inventory. Once posted, the items are in Rose and in Square, ready to sell.
Where to find it: Dashboard › menu (☰) › Take-ins, or CREATE TAKE-IN in the Dashboard's Quick Actions.
Step 1: Start a take-in
Shortcut: click CREATE TAKE-IN in the Dashboard's QUICK ACTIONS to open a new take-in straight away, then go to step 4 below.
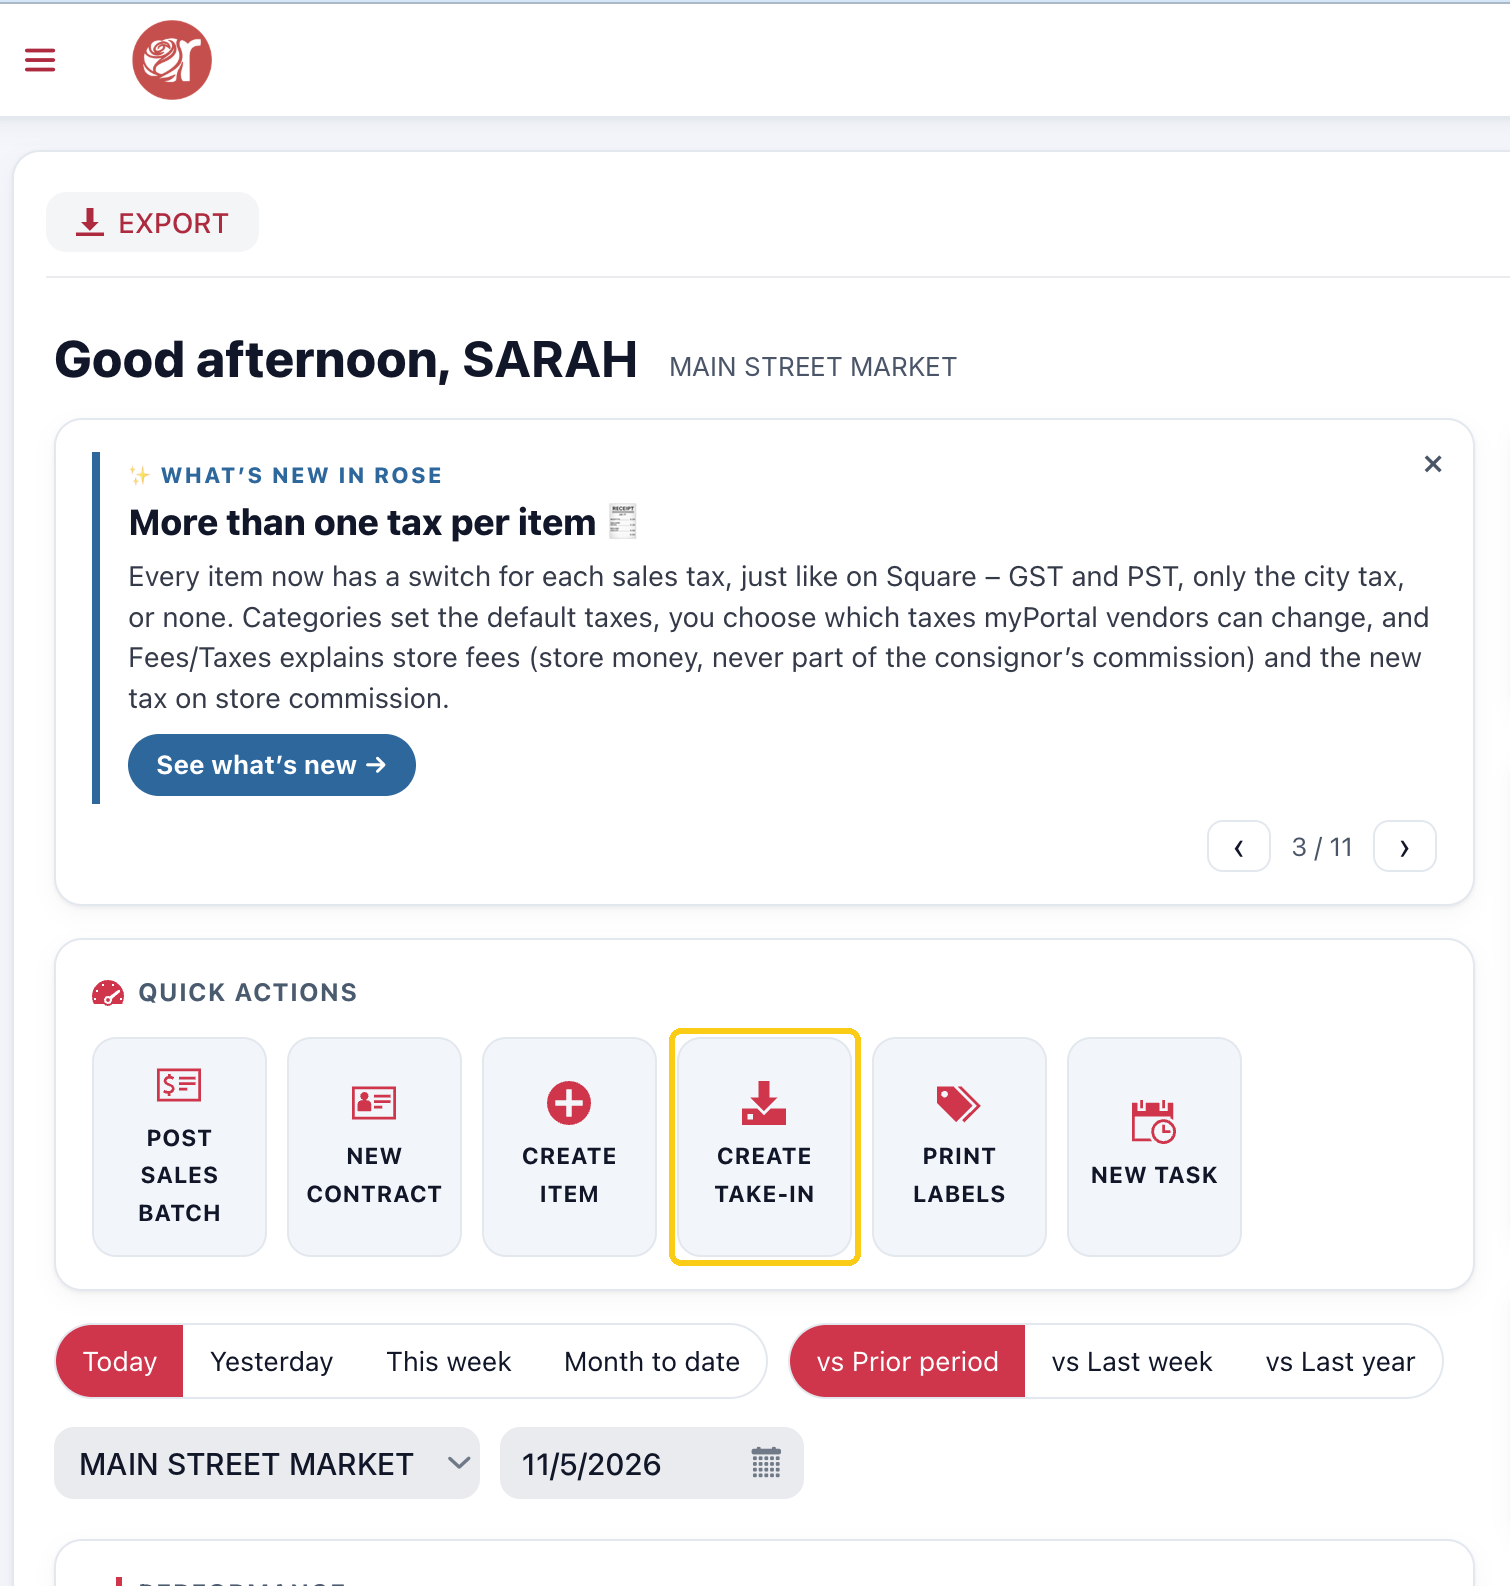
Or open Take-ins from the menu:
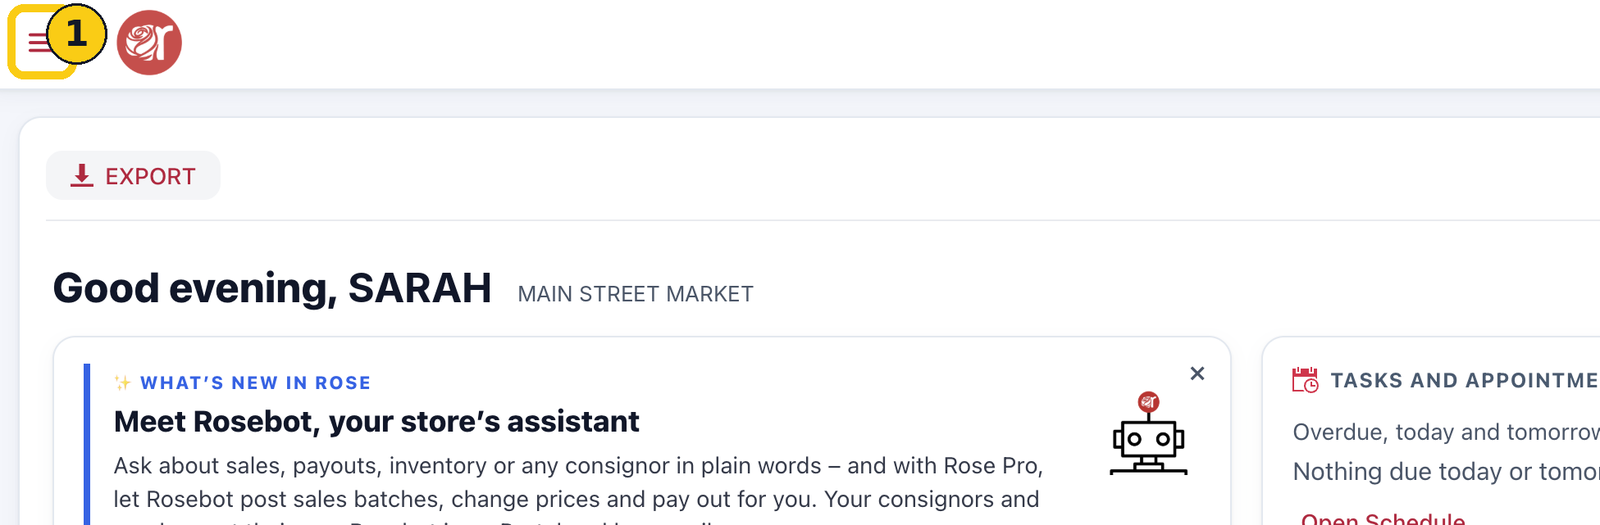
1. On your Dashboard, click the menu icon (☰) in the top-left corner.
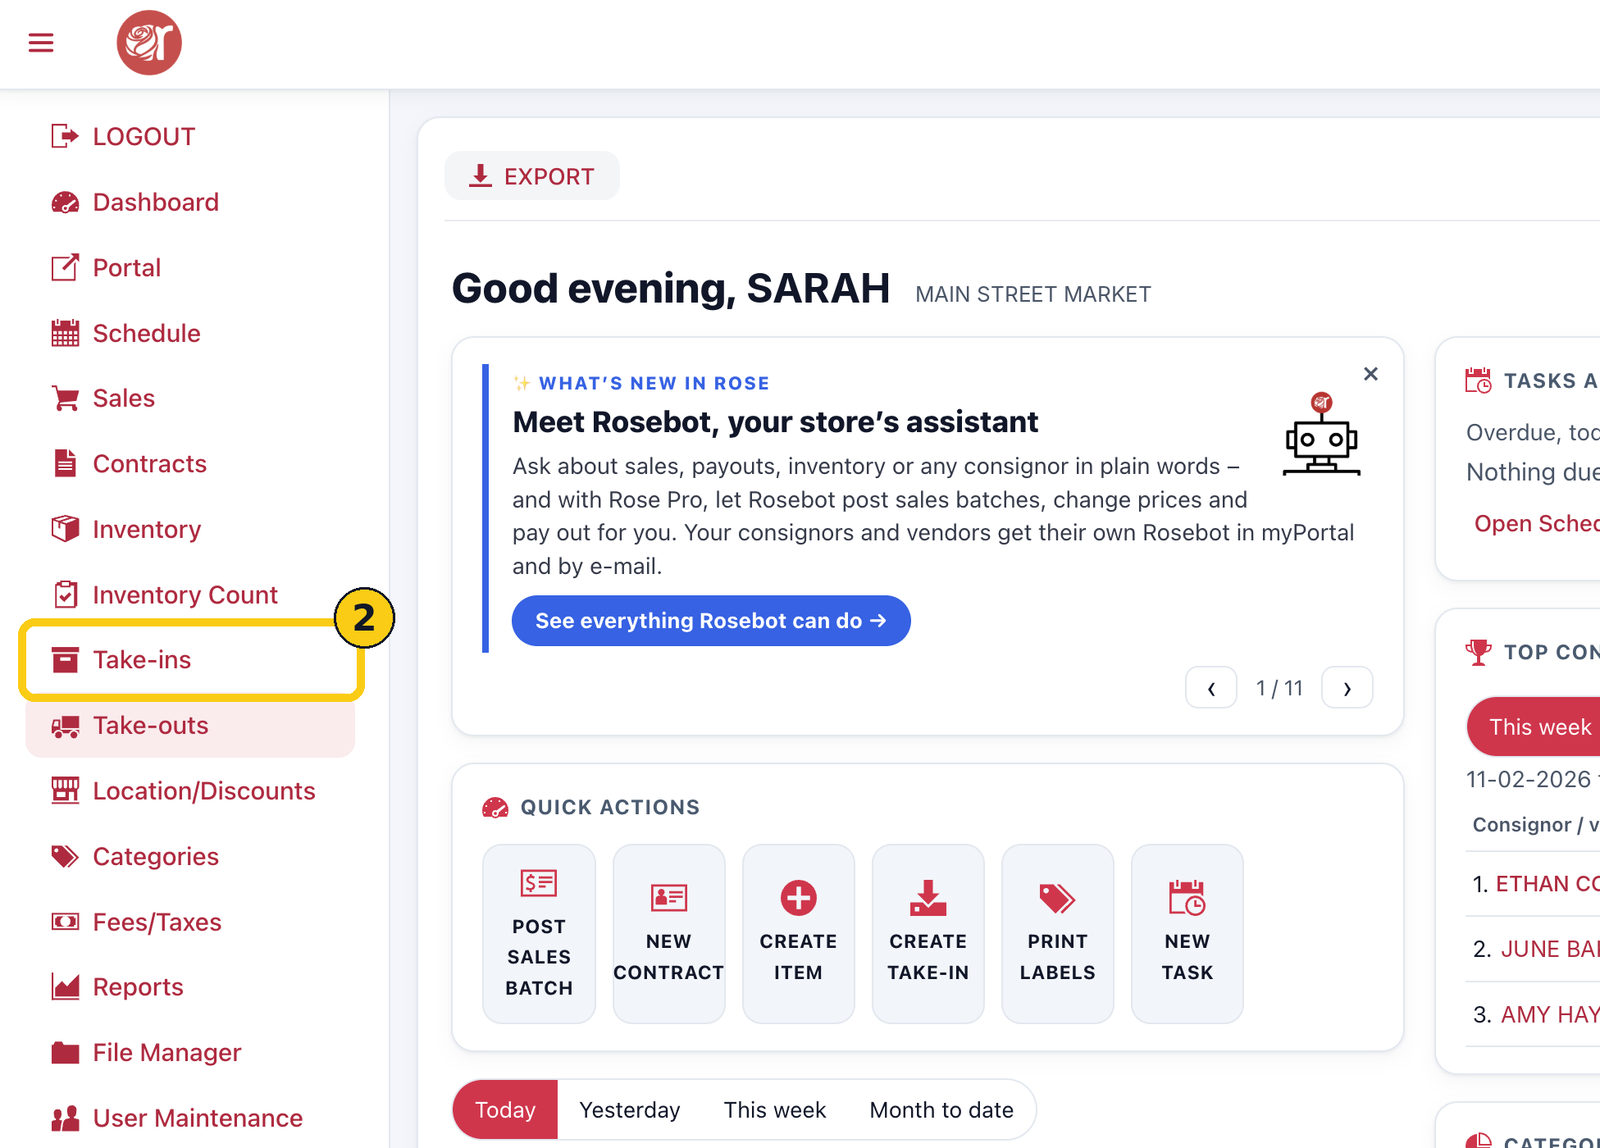
2. Click Take-ins. The list shows open take-ins at your location.
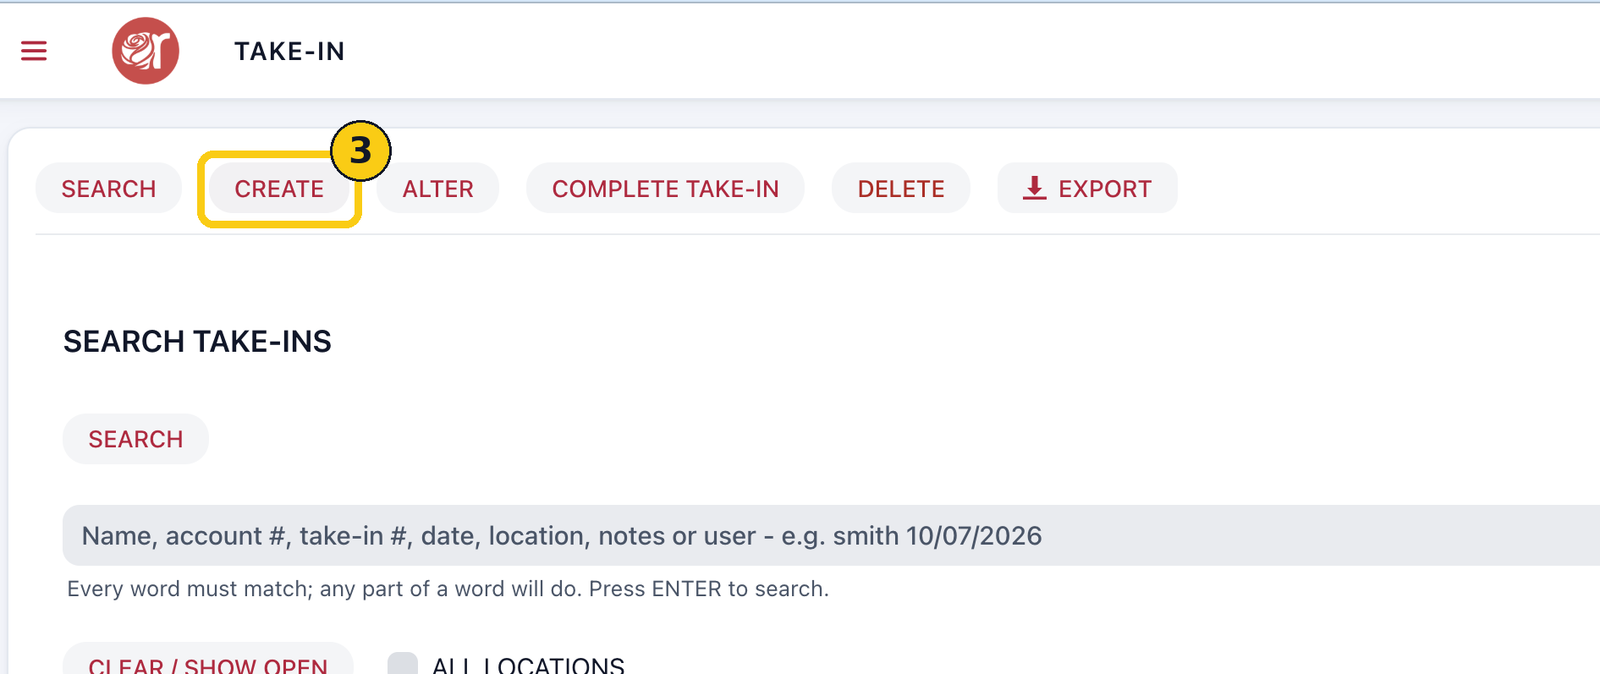
3. Click CREATE.
4. Choose the CONSIGNOR: start typing a name, business or account number and pick from the list. Use CONSIGNOR/CREATE to add someone new.
5. Check the HOME LOCATION. Labels, reports and taxes use it.
6. Add QUICKTAKE NOTES if you like, for example the date and what came in.
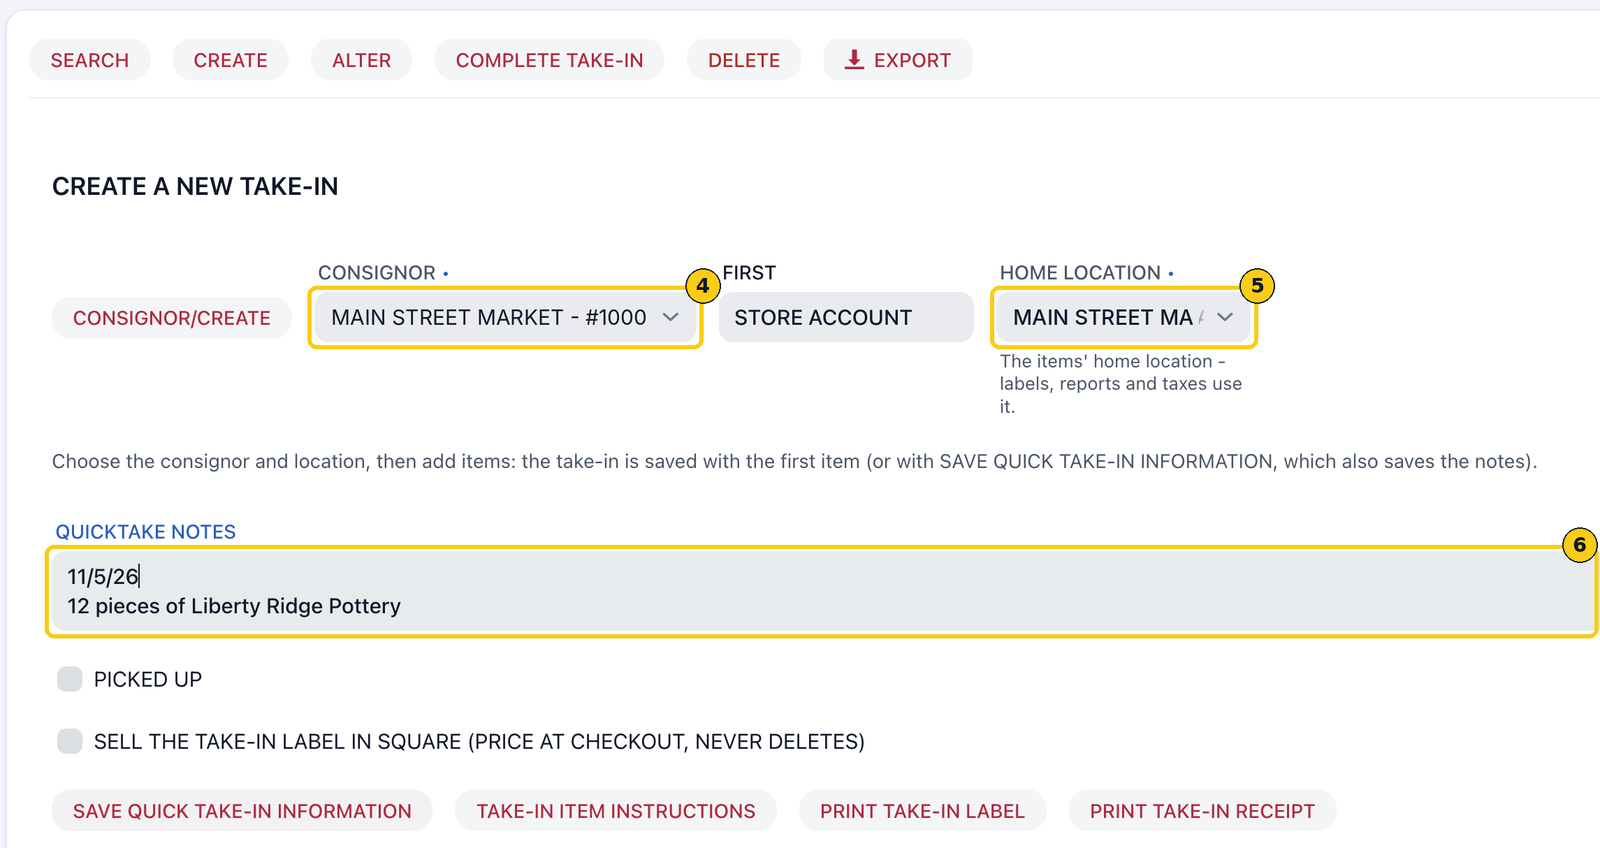
The take-in is saved when you add the first item. To save it before then (with its notes), click SAVE QUICK TAKE-IN INFORMATION.
Step 2: Add items
1. Enter the SKU: scan or type the item's barcode, or click GENERATE SKU for a new one.
2. Enter the ITEM NAME.
3. Pick the CATEGORY. Its shelf life, taxes and price guide fill in.
4. Enter the QUANTITY. Leave it blank if the item isn't counted.
5. Enter the EA.PRICE (price for each one).
6. Check the LABEL type that will print for this item.
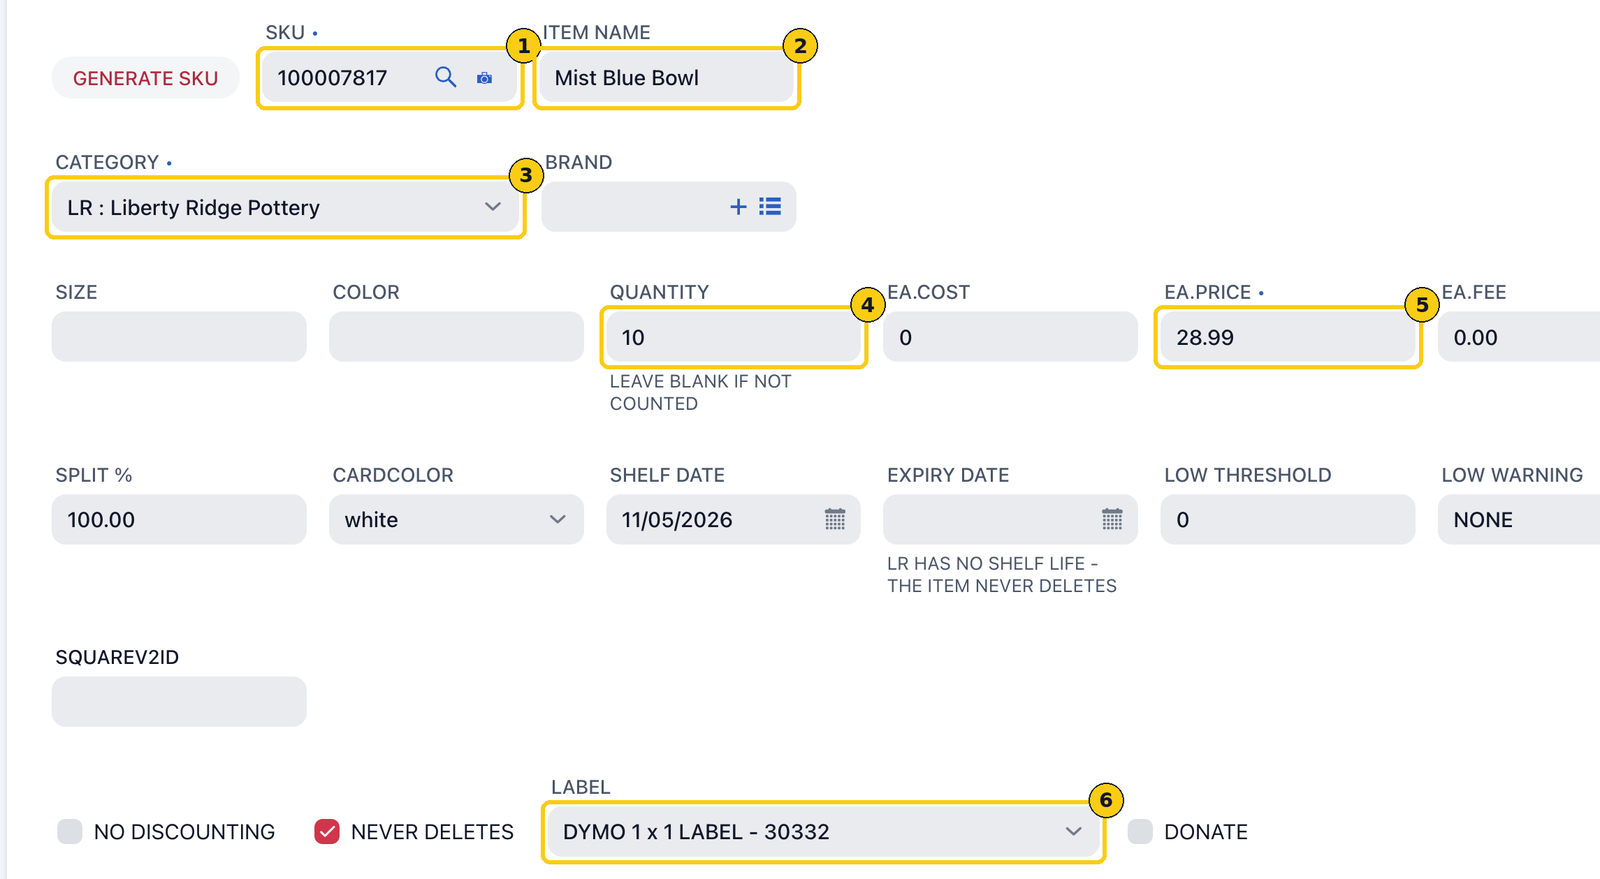
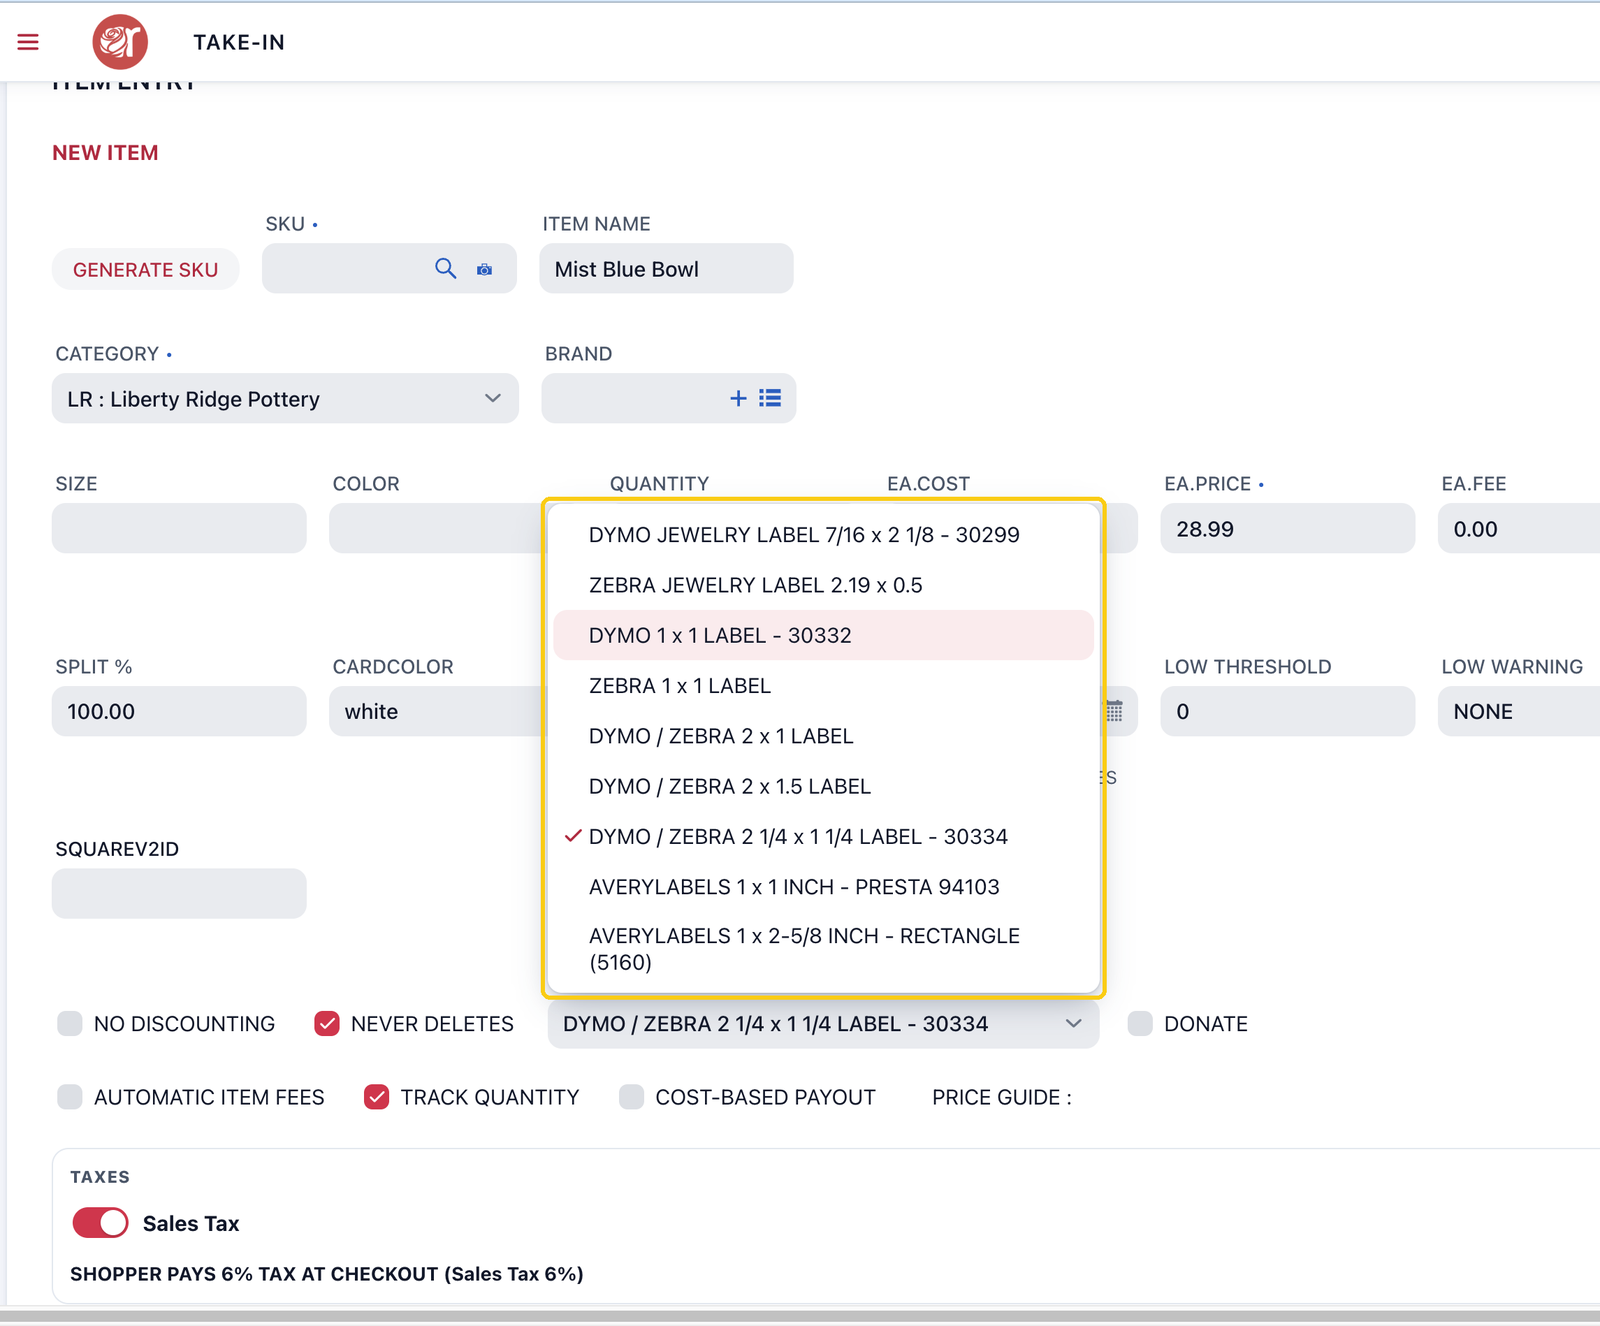
Brand, size, colour, cost, split %, card colour and dates are optional. SPLIT % and the tick boxes start from the consignor's and category's settings.
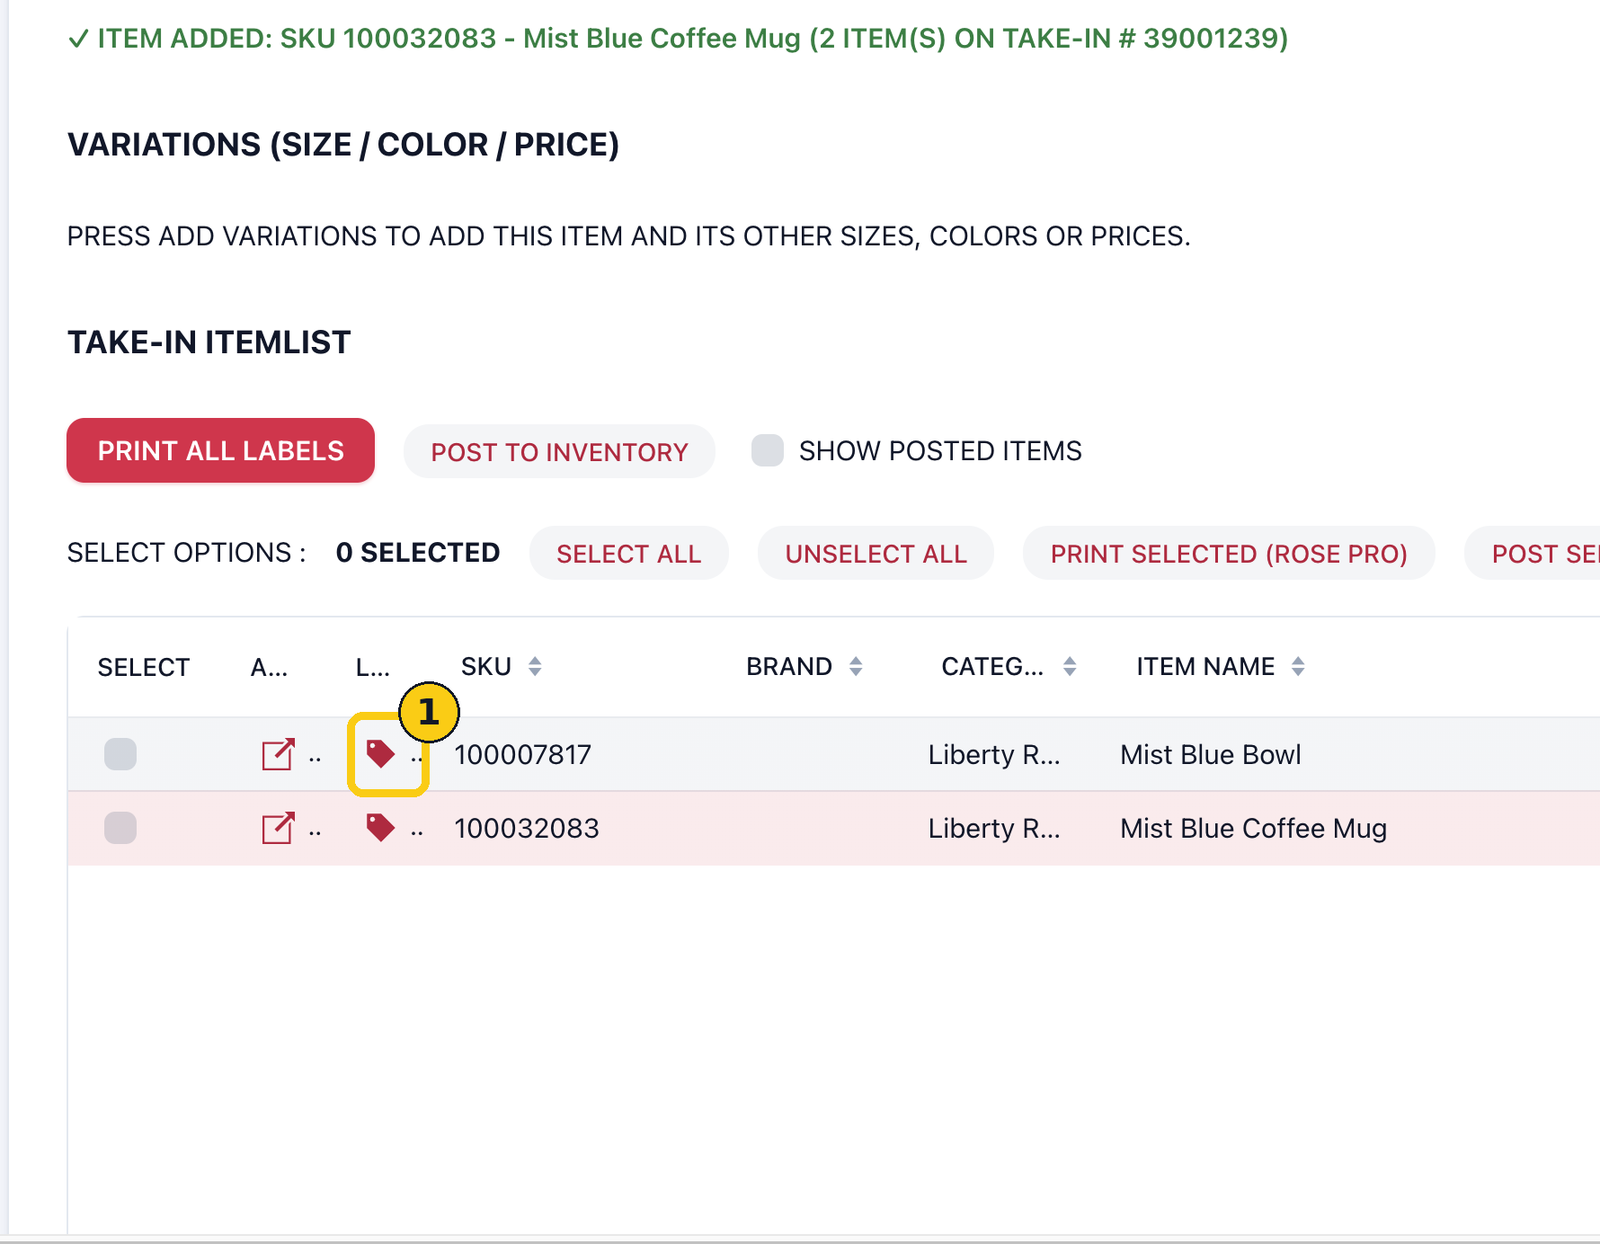
7. Click ADD ITEM. A green line confirms it, for example ITEM ADDED: SKU 100032083 - Mist Blue Coffee Mug (2 ITEM(S) ON TAKE-IN # 39001239). The form clears for the next item.
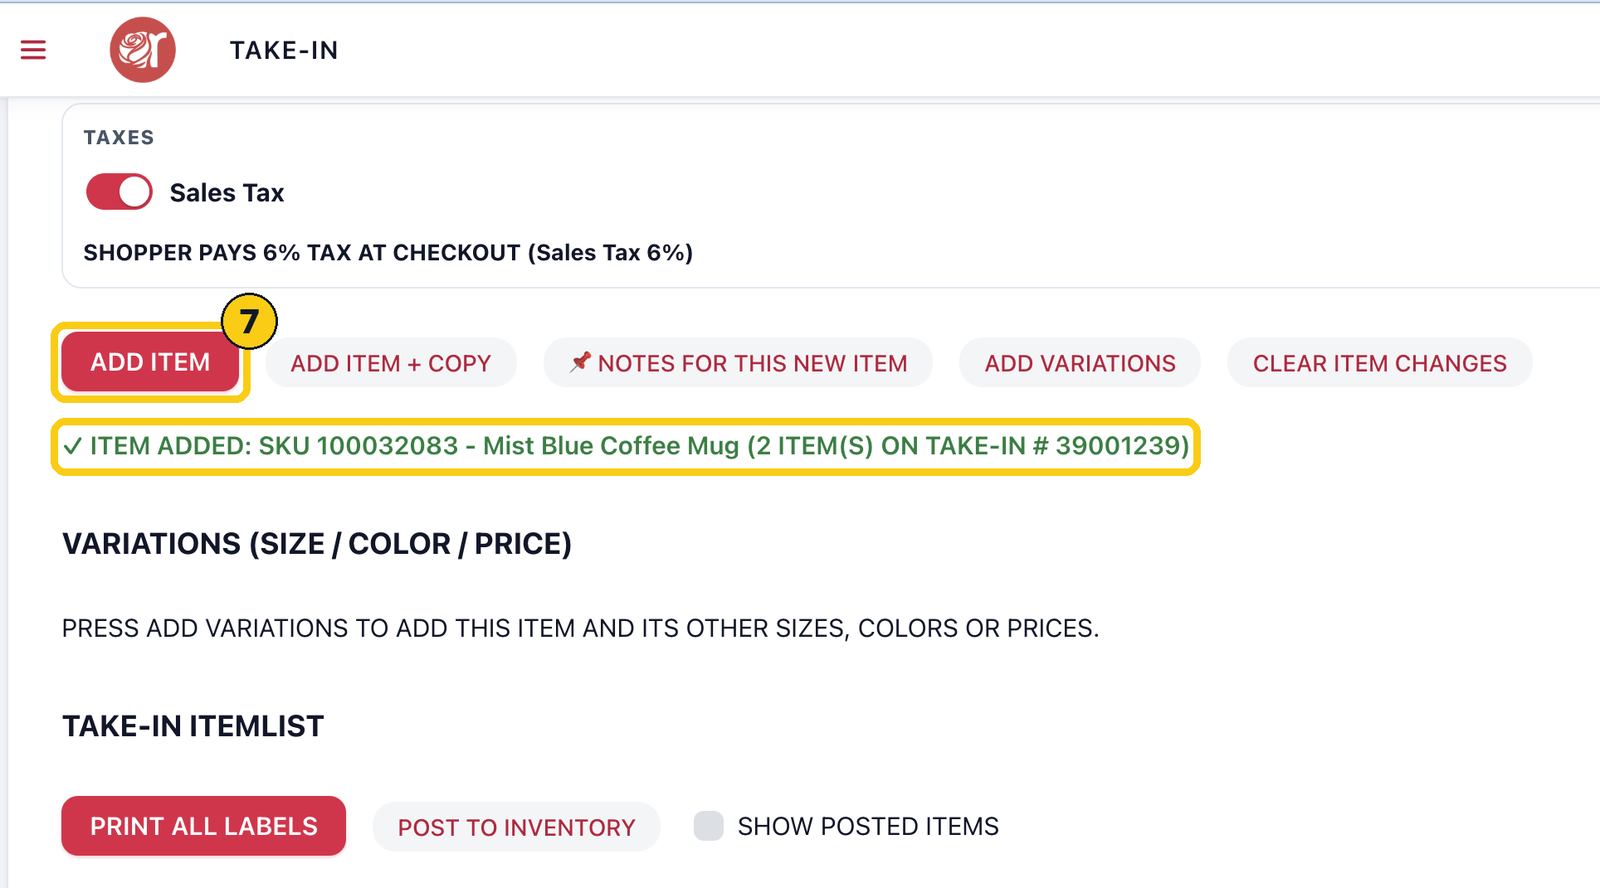
ADD ITEM + COPY adds the item and keeps its details on the form, which is quicker for a run of similar items.
Step 3: Print labels
There are three ways to print labels from the TAKE-IN ITEMLIST: click one item's label, tick the items you want and use PRINT SELECTED, or print every item with PRINT ALL LABELS. Always print from Google Chrome.
Print one item's label
1. Click the tag icon in the item's LABEL column. PRINT PREVIEW opens, showing the label at its real size.
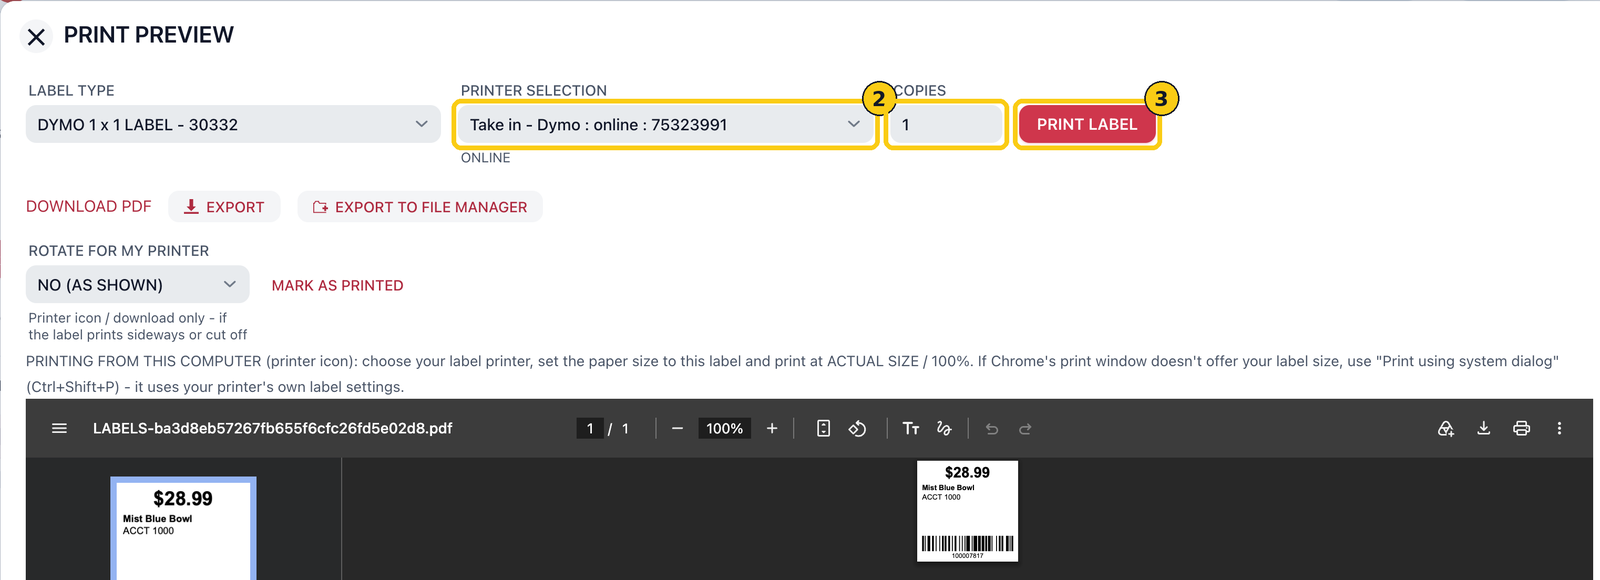
2. Rose Pro: choose your label printer under PRINTER SELECTION (it shows ONLINE when ready) and check COPIES.
3. Click PRINT LABEL. The label goes straight to the printer.
Printing from this computer (Rose Retail, or without PrintNode)
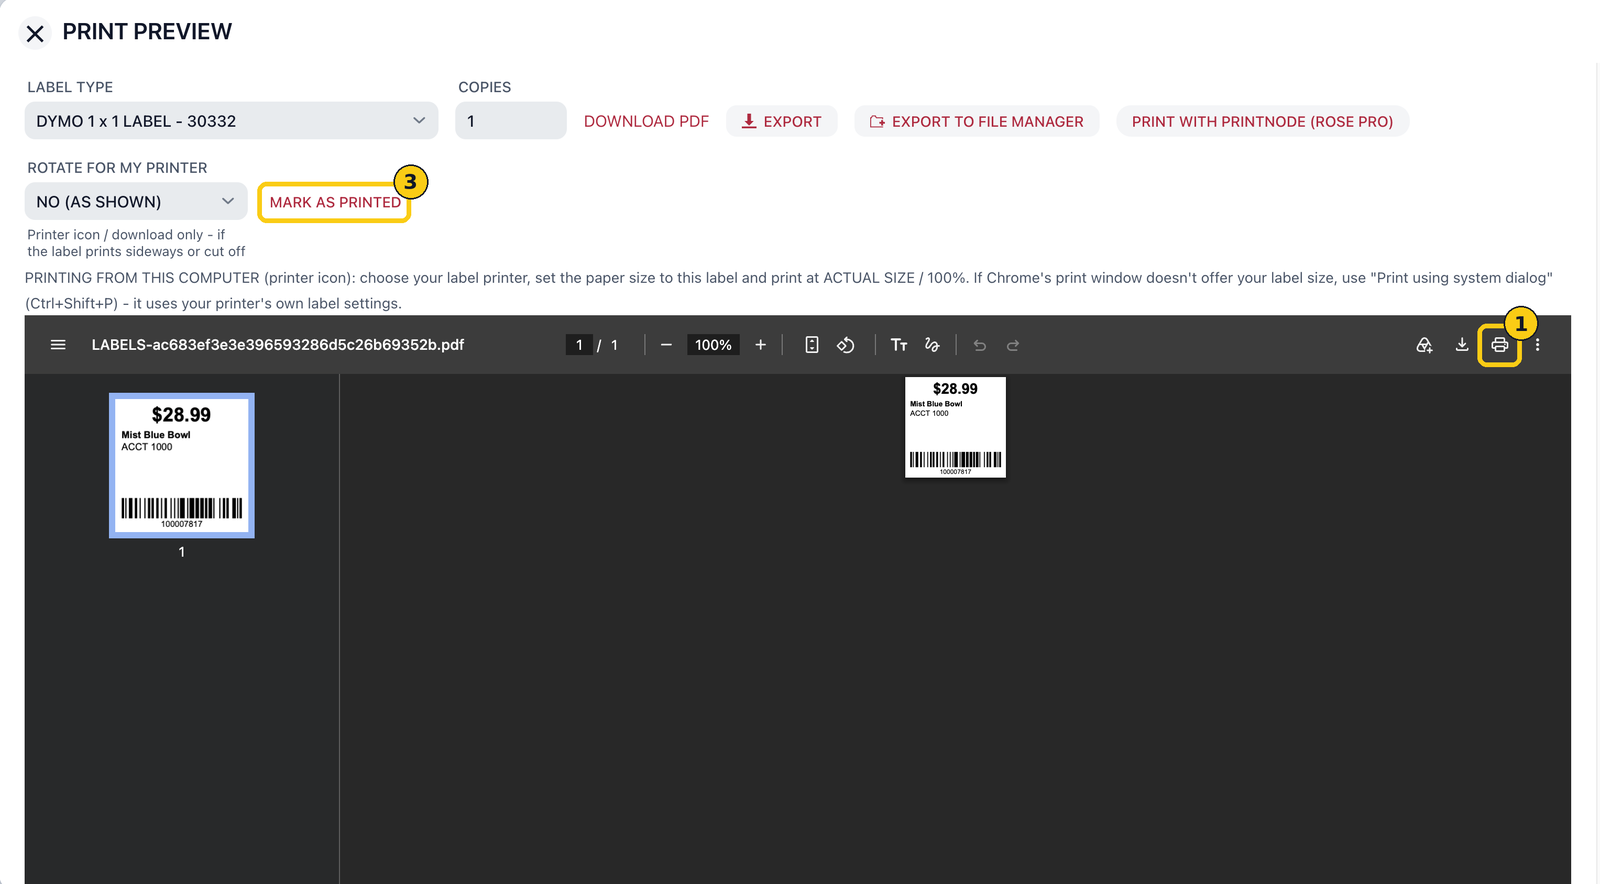
1. In PRINT PREVIEW, check COPIES (one label for each item in stock), then click the printer icon above the label.
2. In the print window, set Destination to your label printer (for example, DYMO LabelWriter 450), Paper size to your label (for example, 30332 1 in x 1 in) and Scale to 100. The preview shows one small label. Click Print.
3. Back in Rose, click MARK AS PRINTED.
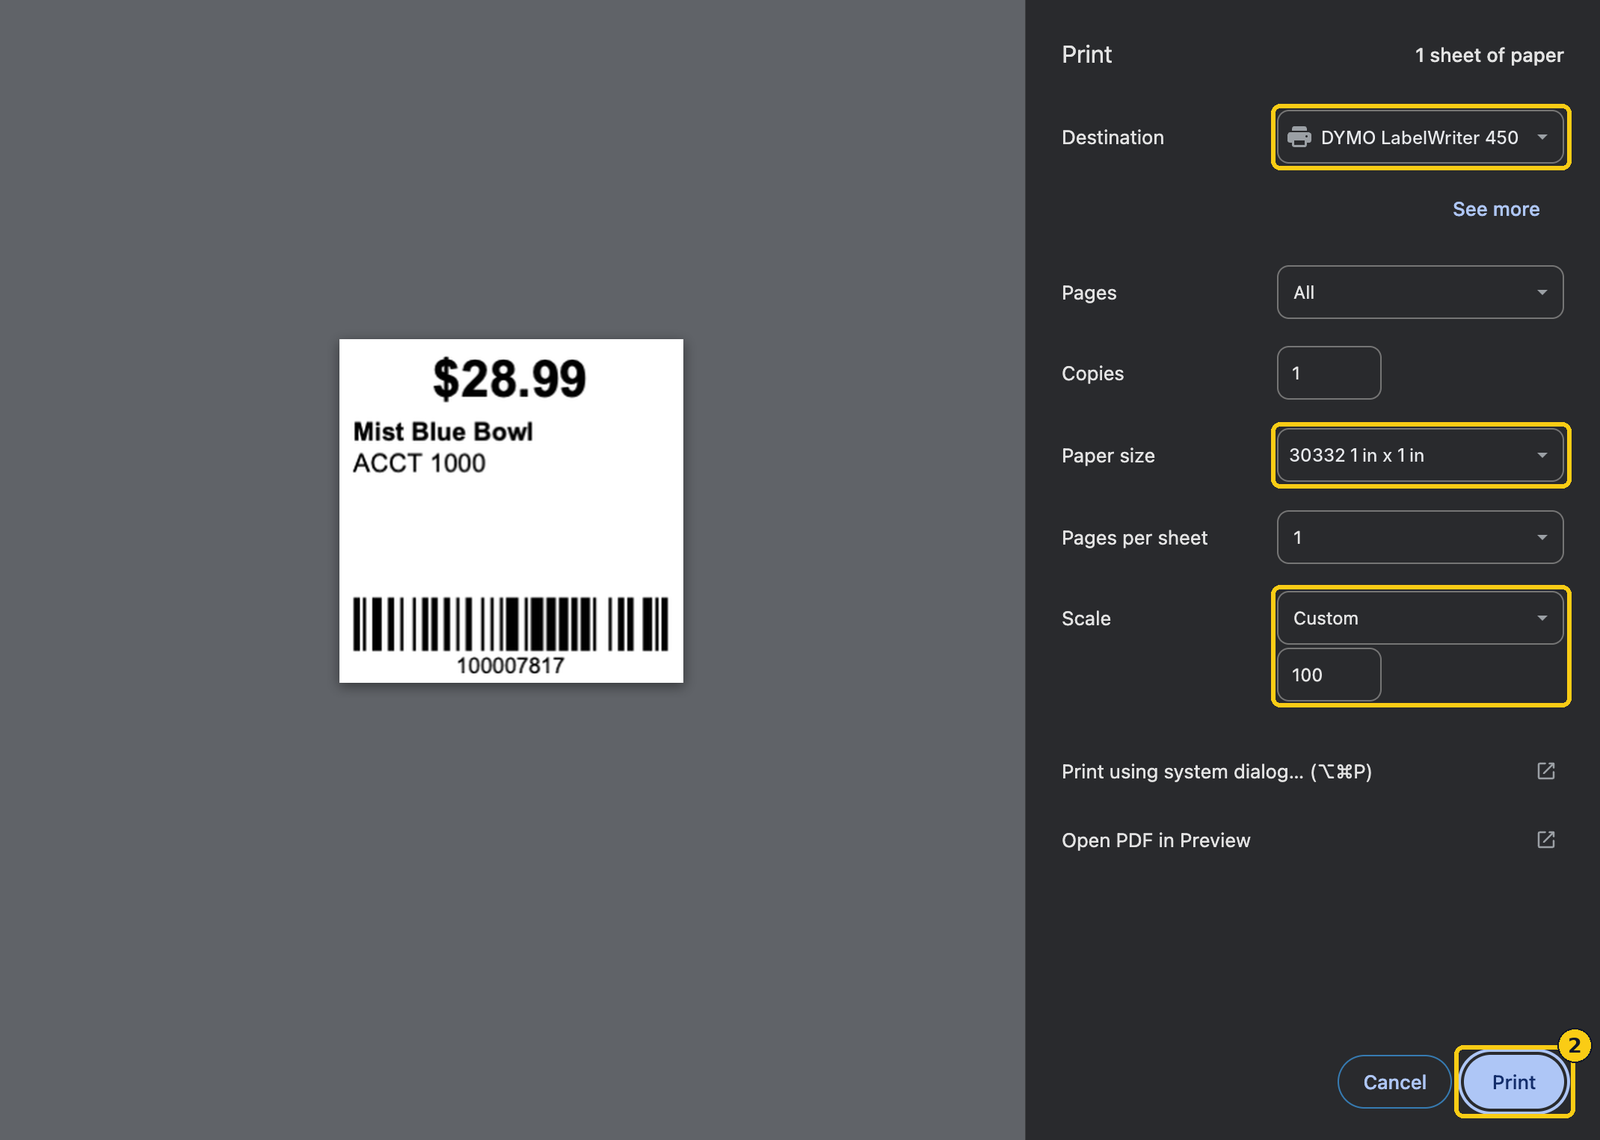
Seeing a full page with a tiny label in the corner? The print window is set to a regular printer or Letter paper. Change the destination to your label printer and the paper size to your label. If your label size isn't listed, click Print using system dialog; it uses your printer's own label settings. If the label prints sideways or is cut off, change ROTATE FOR MY PRINTER in Rose's print preview.
Print labels for selected items
1. Tick the box in the SELECT column for each item you want a label for.
2. Click PRINT SELECTED.
3. In PRINT LABELS FOR … SELECTED ITEM, choose the LABEL TYPE.
4. Choose your label printer under PRINTER SELECTION. Leave BY QUANTITIES ticked to print one label for each item in stock, or untick it and set LABELS PER ITEM.
5. Click PRINT LABELS.
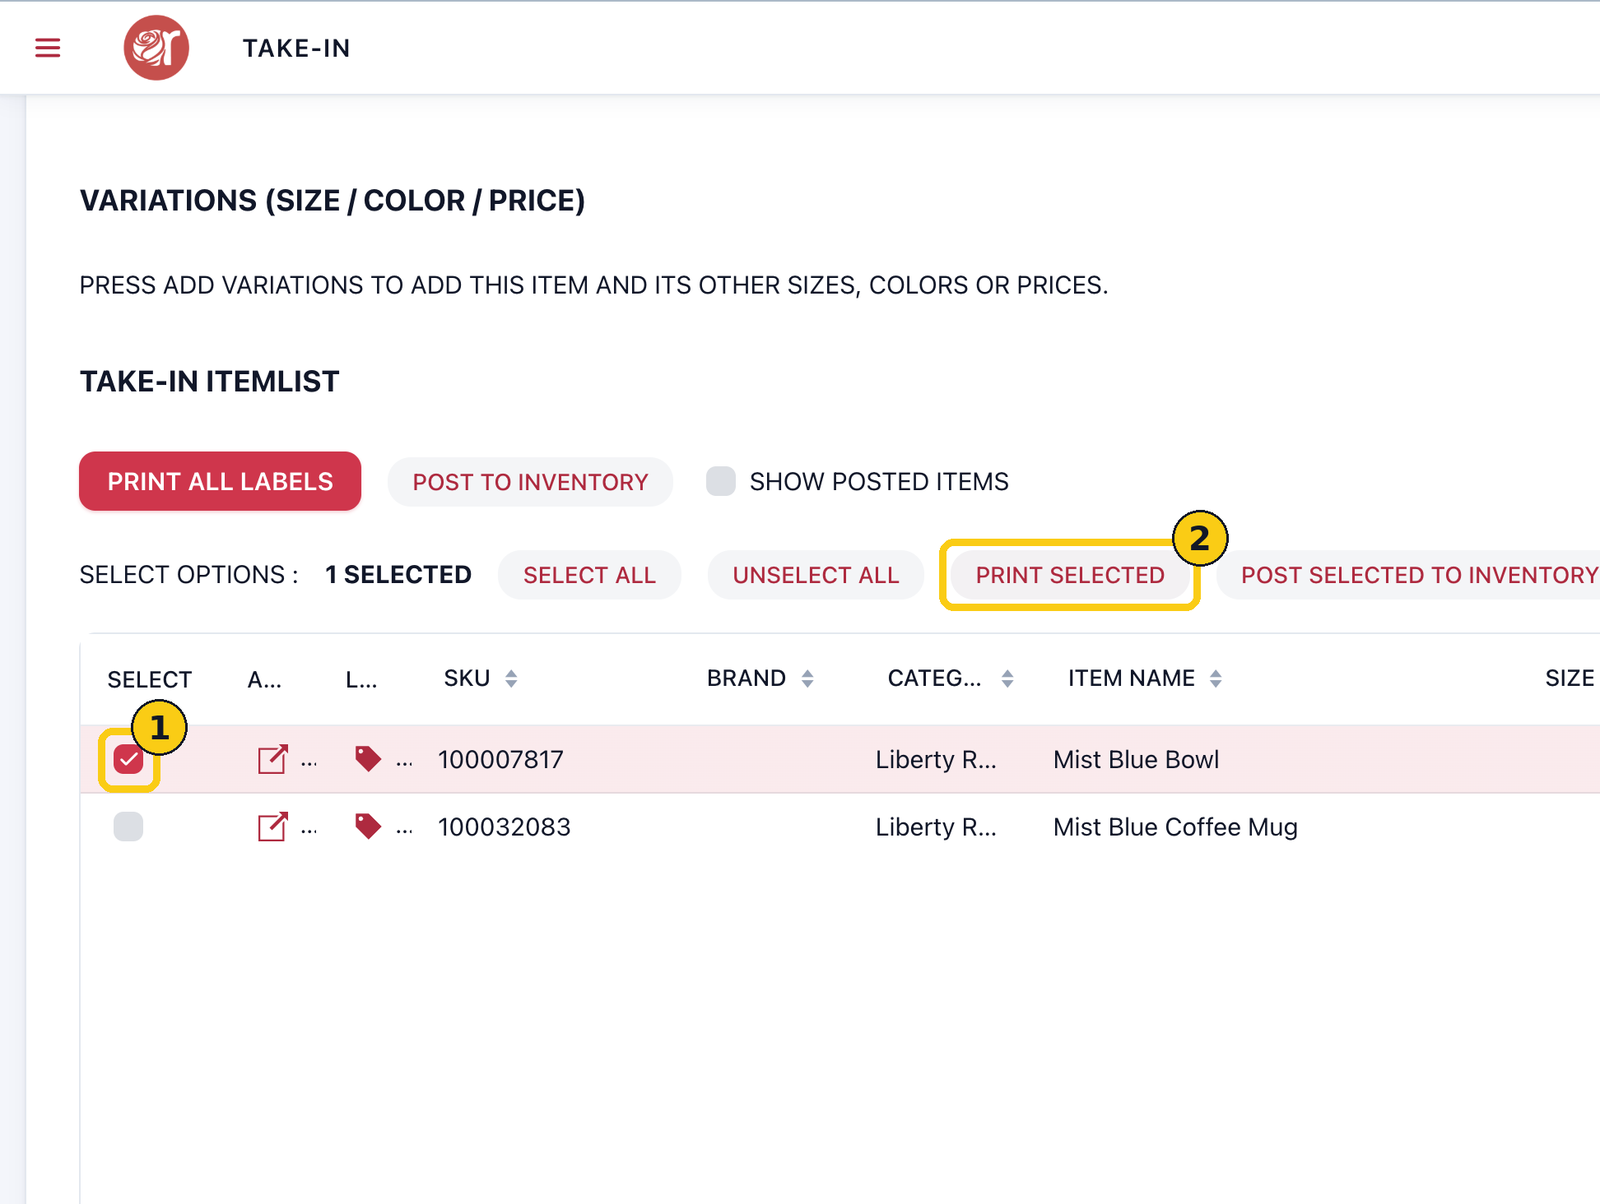
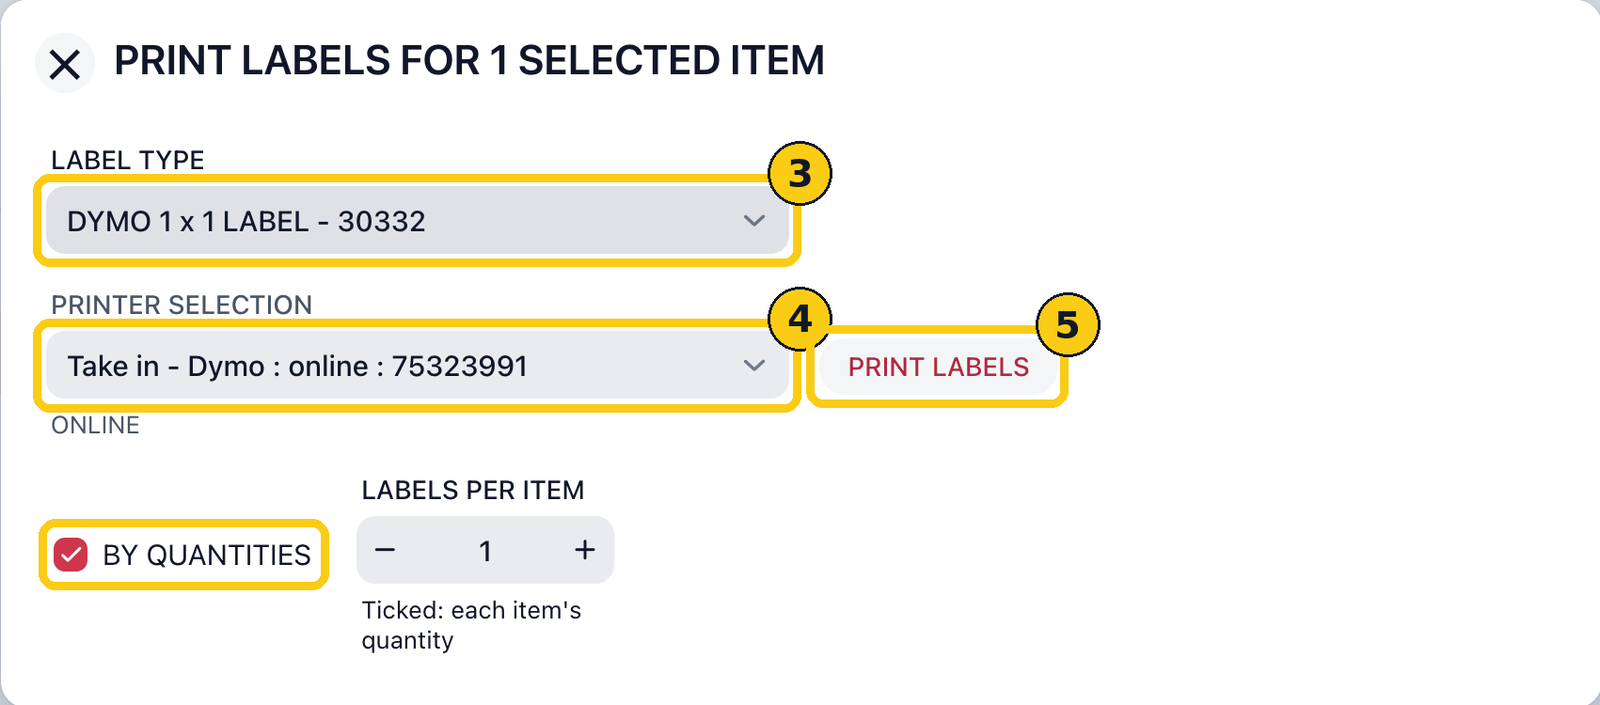
Printing selected items sends labels through PrintNode, which is part of Rose Pro. On Rose Retail the button reads PRINT SELECTED (ROSE PRO) and opens the Rose Pro upgrade window; click each item's tag icon instead.
Print all labels on the take-in
1. Click PRINT ALL LABELS.
2. Choose the LABEL TYPE. BY ITEM (EACH ITEM'S OWN LABEL) uses the label type set on each item.
3. Choose your label printer under PRINTER SELECTION, and leave BY QUANTITIES ticked (10 bowls = 10 labels) or set LABELS PER ITEM.
4. Click PRINT LABELS.
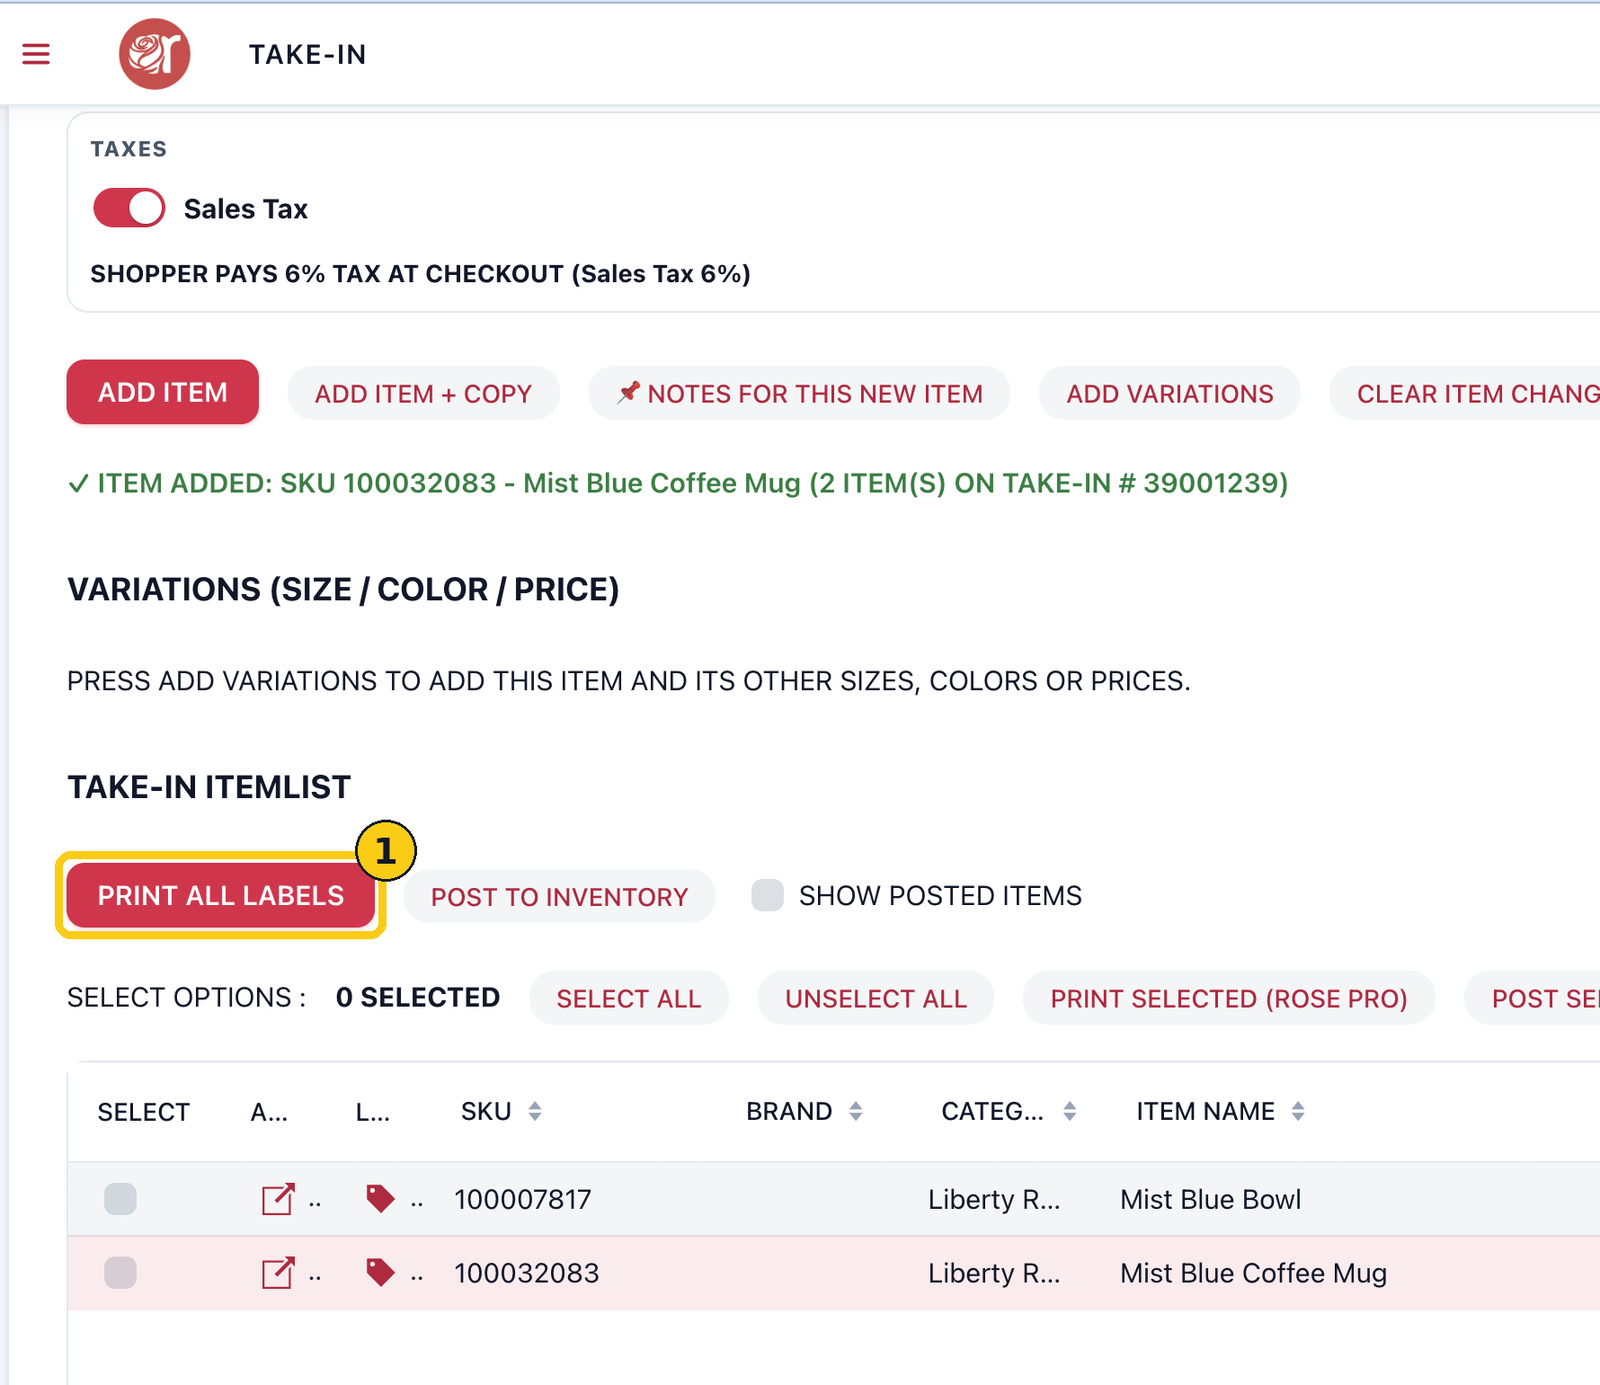
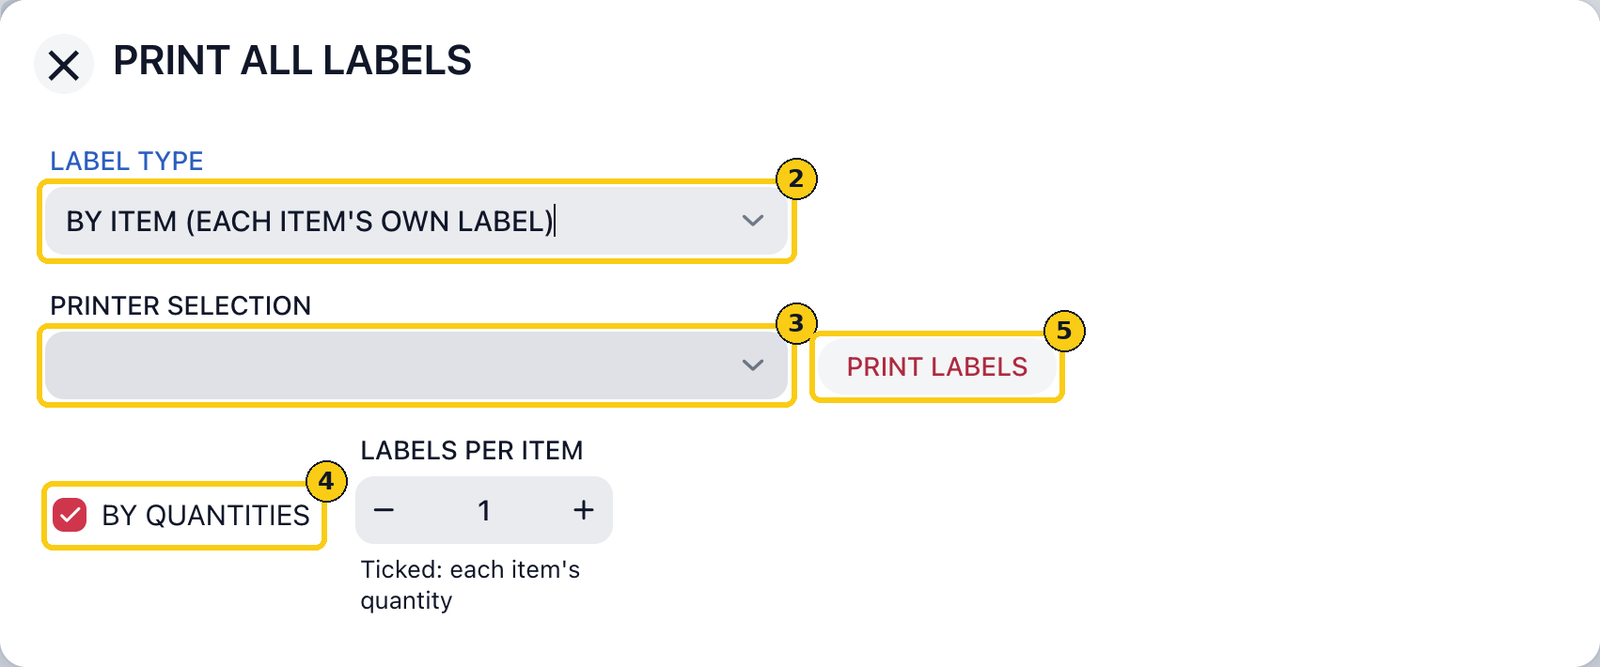
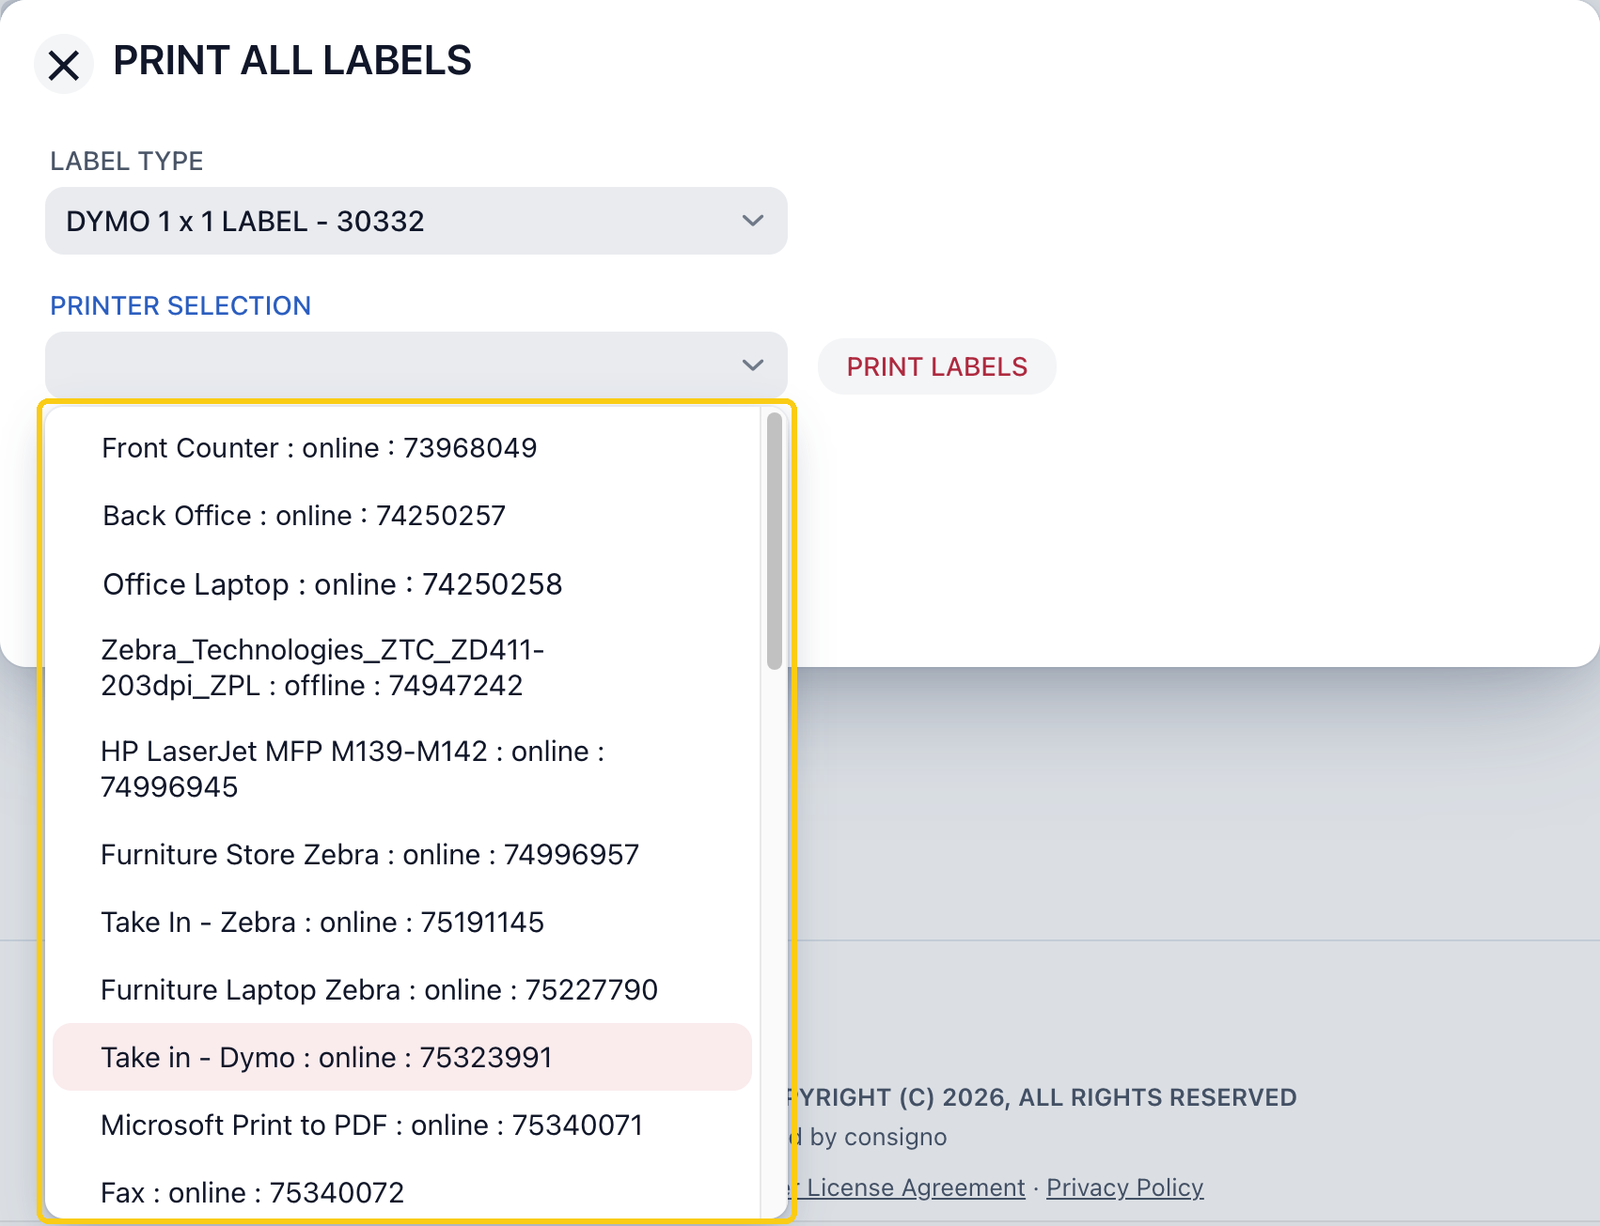
Default printers and label types are set in Administration › Settings.
Step 4: Post to inventory
1. When every item is added and labelled, click POST TO INVENTORY. The items move into Inventory and are sent to Square.
2. Click COMPLETE TAKE-IN at the top to close the take-in.
To post only some items, tick them in SELECT and use POST SELECTED TO INVENTORY. SHOW POSTED ITEMS brings posted items back into the list.
FAQ
Can I come back to a take-in later?
Yes. Open Take-ins, click SEARCH and select it. CLEAR / SHOW OPEN lists every open take-in at your location.
I clicked PRINT SELECTED and got the Rose Pro window. What do I do?
Printing selected labels through PrintNode is part of Rose Pro. On Rose Retail, click each item's tag icon in the LABEL column to print its label.
The label is the wrong size. What do I check?
Check the item's LABEL type, then in the print window set the paper size to that label and Scale to 100.
I have a DYMO Twin Turbo. How do I pick the roll?
In the print window, click Print using system dialog, then Preferences, and choose the left or right roll under Paper Source. It remembers your choice, so print all the labels for one roll before switching.